.svg?width=174&auto=compress,webp&upscale=true "aca-group (black)")
.svg?width=139&auto=compress,webp&upscale=true "aca-group (black)")

Reading time 6 min
Bregt Coenen

In the fast-moving world of IT, ACA Group constantly takes the time to explore innovative solutions and tools to provide the best services to our customers. Recently, we shared our experience with Flux, a CloudNative Continuous Deployment tool that implements GitOps.

Harbor is a CloudNative tool designed to leverage the flexibility, scalability and resilience of the cloud. It is a containerized solution that provides advanced features such as vulnerability scanning and artifact registry. Harbor can run on any Kubernetes based solution on public/private cloud, but also on your local Kubernetes cluster. It is a self-managed solution that needs to be deployed on your Kubernetes cluster. You can choose the components to deploy based on your needs. For some features, for example vulnerability scanning, a selection between different tools can be made.
We are excited to use Harbor Registry for our projects in the coming months because of the following benefits:
It also has the most complete set of features of any container registry we have ever worked with, such as:
Additionally, Harbor has a well-documented API, and we use a Terraform provider to set up resources like projects and users within Harbor using Terraform code.
As you can read, Harbor has a lot to offer. ;-) In the next section, we take a deeper look into some of the features we haven’t covered yet, but are definitely worth mentioning.
One of the most interesting features is the built-in Vulnerability Scanning. Harbor has a built-in vulnerability scanning tool that automatically scans container images for vulnerabilities when pushed to the registry. A job will be scheduled when a container image is pushed and once the result is available, it will be visible next to the container image.
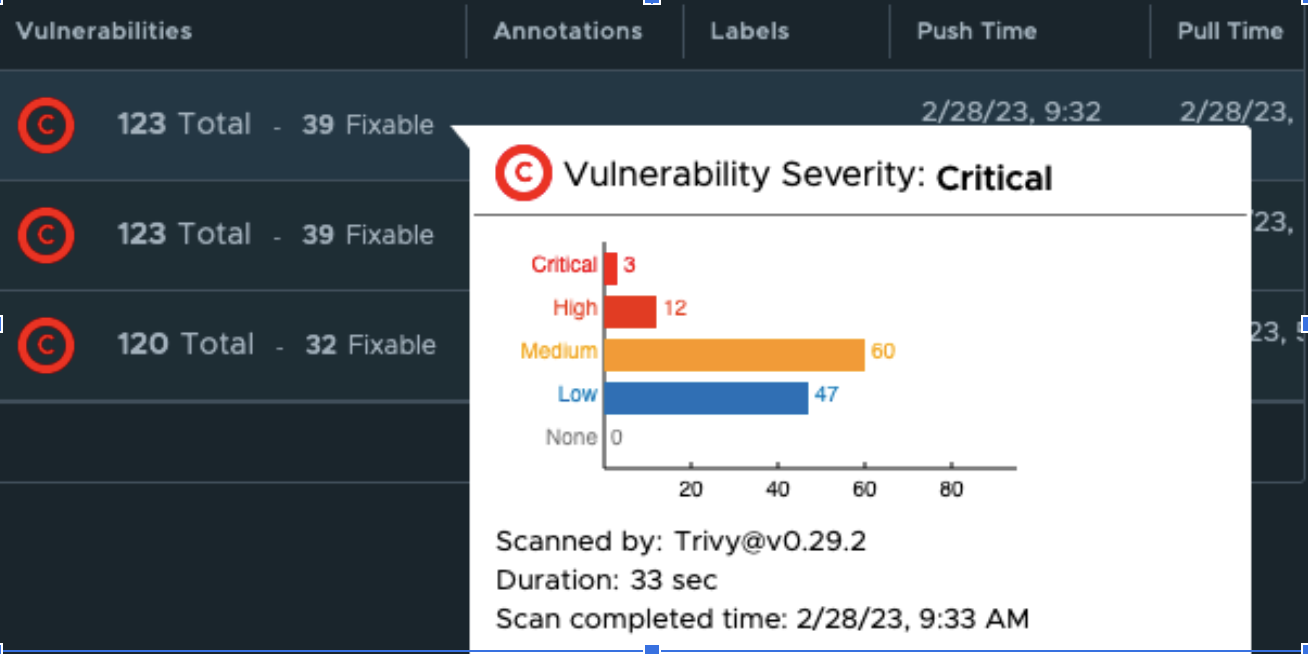
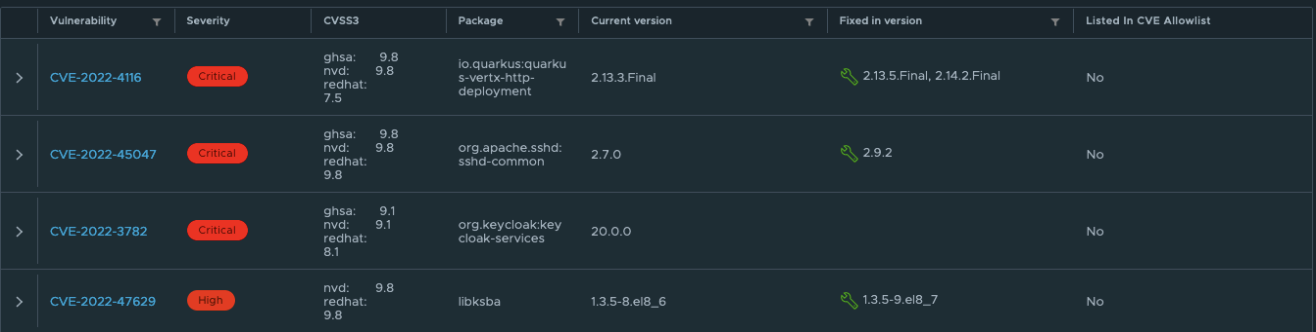
You can also get more details on the specific vulnerabilities that are found:
For us, having these insights on the quality of the containers is a huge improvement compared to the current container registry we are using. By making some additional configurations, we can make the vulnerability scanning experience even better. Some examples:
Harbor uses Trivy as its default vulnerability scanning tool, but it's easy to switch to another tool by installing it on your cluster and registering it in the Harbor interface. With these simple steps, you can take container security to the next level.
Harbor also offers a Container Image Signing feature that allows users to verify the trust of container images. When Notary or Cosign is used to secure container images, Harbor can validate their signatures, ensuring that the images have not been tampered with by any unauthorized sources other than your build tools. The Container Image Signing feature is signified by a green check mark in Harbor's interface, indicating that the image has been correctly signed.

While this blog post won't cover how this feature works, you can find detailed documentation on the process via this link.
In addition to regular users, Harbor also allows for the creation of robot accounts. These system users are not associated with personal accounts and are often utilized by scripts and processes to authenticate with the Harbor registry. For instance, when building a container image, scripts may use a robot account to push the container image to the Harbor registry.

To increase security, it's possible to set up an expiration time for robot users. Moreover, the access rights can be restricted to a particular project, and even the level of permissions within that project can be customized. The audit log records all activities performed by the robot account, just like regular users.
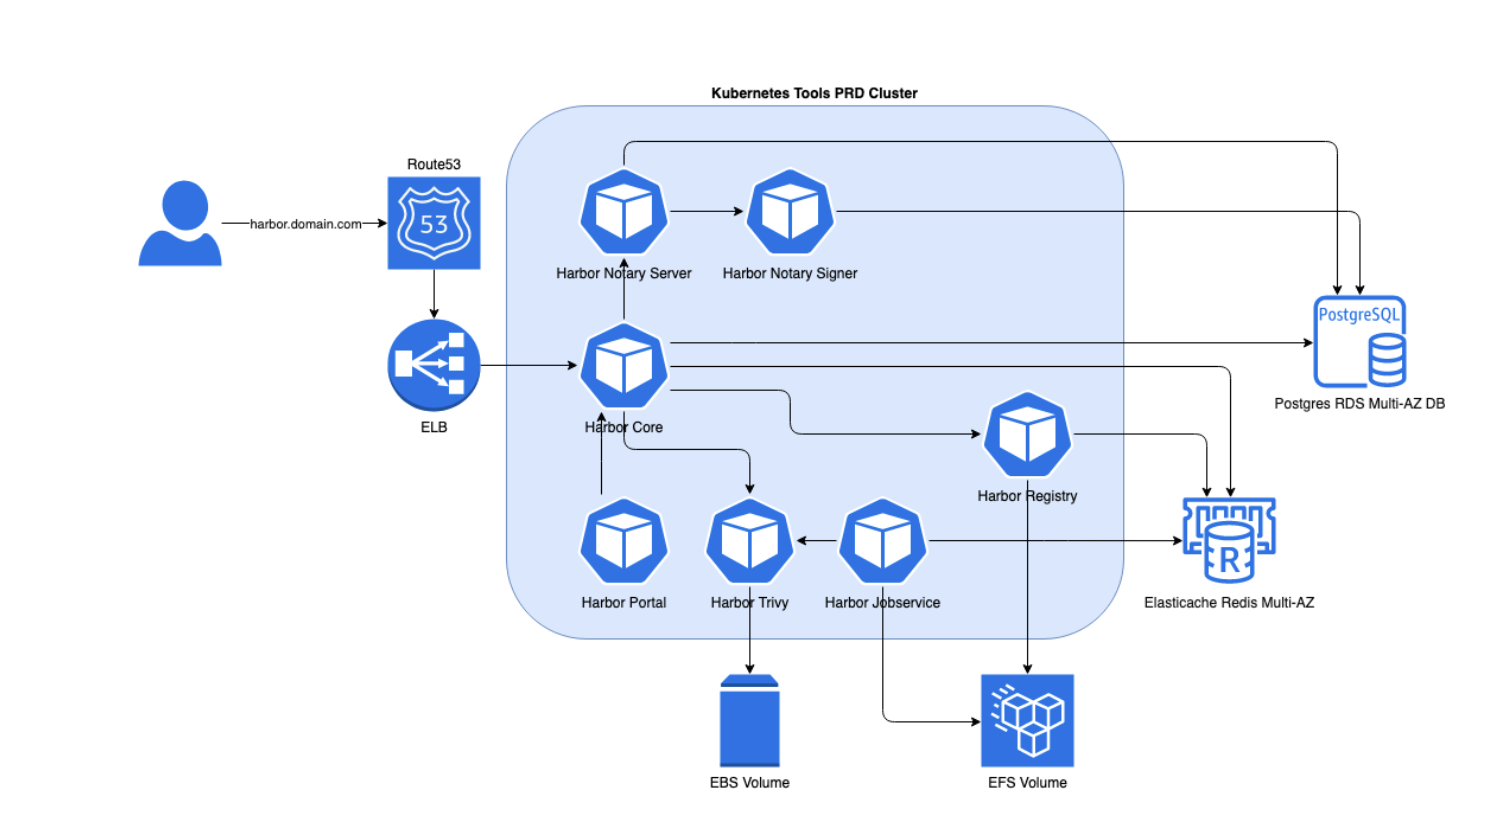
We run Harbor registry on EKS, the Kubernetes Service provided by AWS. Since we are running on AWS, we can use some of the AWS services to provide some of the dependencies.
We have 3 layers of configuration in this setup:
Within the ACA Group, we try to manage all our infrastructure as code. We use Terraform to setup all the dependencies for our Harbor registry:
Once these resources are available, we can generate the Kubernetes configuration and deploy these to our Kubernetes cluster.
We use a helm chart to generate the Kubernetes configuration files that are required to set up Harbor. These are YAML files that are stored in GIT repositories. Ultimately, flux will deploy these YAML files to the Kubernetes cluster.
ℹ️ you can read about deployments with flux in another blogpost here.
As a result, the following workloads are created on your Kubernetes cluster:
Additionally, various Kubernetes objects are generated, including the Ingress, which exposes the user interface (UI) on your specified URL. If you want more details, you can directly install Harbor on your local Kubernetes cluster by running the Helm install command:
Now that we have the Harbor registry up and running, we can efficiently create various resources such as projects, robot accounts, and retention policies within it.
Once again, we want to manage these resources in code instead of creating them via the UI. This not only helps us track the changes effectively but also prevents any potential misconfigurations through pull request mechanisms.
With its comprehensive and well-documented API, Harbor allows many tools to develop custom addons. Leveraging our expertise in Terraform code, we prefer the Terraform Harbor addon to efficiently manage the resources within the Harbor registry.
The following example will create a project within Harbor:
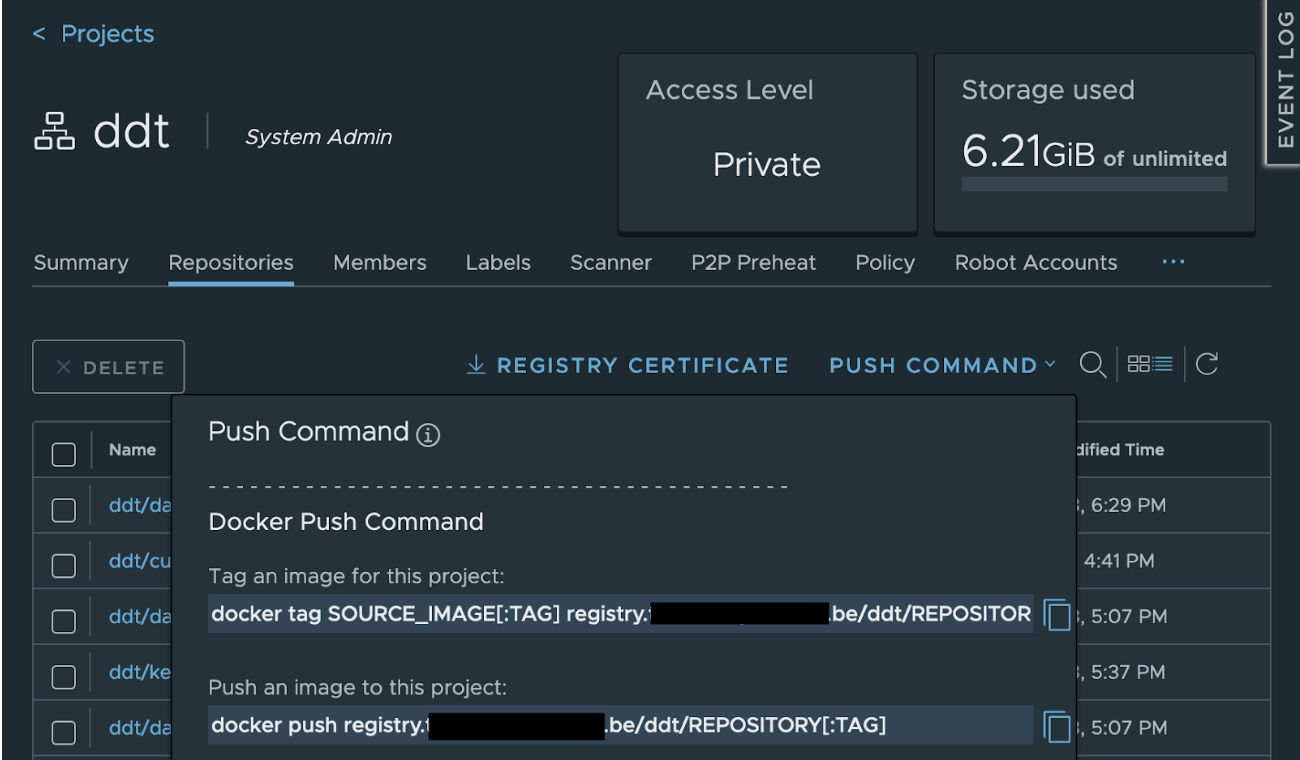
After deploying the Harbor registry and creating projects, it becomes a functional container registry that operates similarly to any other container registry. To push container images to the Harbor registry, conventional build jobs can be used. However, the build job requires authentication credentials, usually from a robot account.
Following that, you have to update the configuration of your jenkins, tekton, BitBucket Pipeline, GitHub action, or similar job to specify the correct project and the Harbor URL, such as registry.example.be/myproject.
The push command can also be found in the Harbor interface:
After pushing the container image to the Harbor registry, it can be pulled from other locations.
To pull an image to your local machine using Docker, you can use the following commands:
To utilize the container image in a Kubernetes environment, start by creating a Secret with the "docker-registry" type that includes the necessary credentials for deploying the container image. As a Secret is specific to a namespace, you need to run this command for each namespace that uses a container from the Harbor registry.
Now you can point to the container image within your Deployment, StatefulSet, Job, … The imagePullSecrets section points to the Secret created in the step above.
This blog post provided an overview of the numerous advantages and features of the Harbor registry. We also shared our approach to setting up and utilizing the container registry.
At ACA, we use Harbor as the container registry for one of our most important projects and are currently in the process of adopting it as our default registry for new projects. Once it has been set up, we will create a plan to migrate additional active projects. Our goal is to enhance stability, availability and security for our clients.
If you would like to learn more about Harbor registry, feel free to contact us!


In today's digital world, it's crucial to offer a smooth and personalized experience to your customers, no matter which channel they use to communicate with you. For this, Digital Experience Platforms (DXPs) are the solution. DXPs act as a central hu
Read more

CloudBrew has always been a highlight on our calendar, but the 2025 edition felt different. Perhaps it was the timing. Just the month prior, November 2025, the Azure Belgium Central region finally opened its doors. ACA has always operated from the he
Read more

Better uptime, lower costs, and avoiding vendor lock-in. These are three of the reasons why our customers opt for a multicloud strategy. Our Cloud Project Manager Roel Van Steenberghe explains what such a strategy entails and what the advantages of G
Read moreGet in touch with our experts today. They are happy to help!

Get in touch with our experts today. They are happy to help!
Get in touch with our experts today. They are happy to help!
Get in touch with our experts today. They are happy to help!
