.svg?width=174&auto=compress,webp&upscale=true "aca-group (black)")
.svg?width=139&auto=compress,webp&upscale=true "aca-group (black)")

Reading time 7 min
ACA Group Team

So, you’re running a successful B2B business and are thinking about selling your products through a web shop. But while examining the possibilities of online commerce, you realize you need to link your invoicing system, payment providers, order management, usability, customer loyalty programs and much more. So: where do you begin? In this blog post, we give some concrete steps on how to get started in B2B e-commerce.
An e-commerce platform can bring important advantages to you and your customers. But how do you actually get started implementing an e-commerce channel?
According to us, there are 6 critical steps in bootstrapping your B2B e-commerce journey.
Let’s zoom in on these steps one by one!
To get started with B2B e-commerce, your company should have a clear digital vision around it. Now, your company probably already has some kind of corporate vision or tagline. A B2B paint shop could have a tagline like “We color your world!”. This is not what we mean by “digital vision”. The digital vision of the B2B paint shop could be “We want to be the best online wholesaler in painting products in the EMEA region”. That is a clear digital vision.
A vision is important because it sets a mindset and a clear focus. It energizes your co-workers to jump on the same train. Since your B2B company will go through a significant change, you’ll want to keep everyone involved and enthusiastic during this process.
However, a digital vision means nothing without clear goals to support it. It goes without saying that these goals should be set according to the S.M.A.R.T. principle (specific, measurable, assignable, realistic and time-related). A goal according to this principle could be “30% of our total revenue must come from our online channel by the end of 2021”.
Setting a digital vision and goals is one step, but this is not sufficient to convince the leadership of your organization of your wild e-commerce plans. You’ll need their investment, so you’ll need to come up with a plan.
First, it is important to identify the stakeholders in your e-commerce journey. Involve them in the process, as they will have valuable information for making your business case stronger.
Next, set up key performance indicators (KPIs) that support your B2B e-commerce goals. You will only know that you’ve achieved each goal when they are parametrized and measurable through a KPI. Establish a baseline (as is) for your KPIs, as well as the target (to be).
You will also need to have an idea of the total cost of ownership (TCO) of your B2B e-journey. This is your total investment cost. Consider a TCO over several years and include product licenses, effort from your marketing and content teams, running and maintenance costs, 3rd parties and other costs that impact the TCO. Of course, your partners can help you define and fine tune your TCO.
Using the TCO, you can now estimate the return on investment (ROI). Model how your sales will increase, how your customer portfolio will expand, and how your existing costs will decrease. Now you can calculate at what point in time you will have earned back your investment. Don’t panic if your ROI spans over multiple years: Rome wasn’t built in a day either.
Last but not least, present the business case to your superiors. Make a nice, colorful presentation and convince them that the time is right and that standing still is deteriorating.
Congratulations, your leadership has approved your business case! Up to the next step: gathering the high-level requirements of the to-be B2B e-commerce platform.
Thinking of an e-commerce platform, you’d assume that you need only one tool. The truth is, an e-commerce platform is more like an ecosystem with many tools working together.
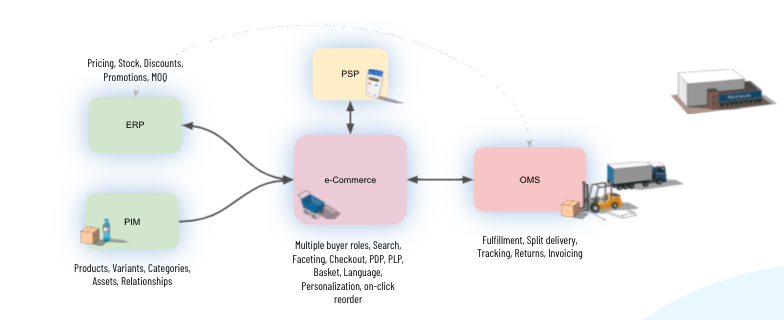
At the core of the ecosystem, you’ll find the e-commerce tool itself, the web shop, with features like faceted search, shopping basket, checkout and personalization. Pay additional attention to the specific B2B features here such as one-click reorder, customer based discounts, bulk pricing and multiple buyer roles.
Your e-commerce tool will get its product information from a PIM (Product Information Management) tool that holds all product characteristics, variants, categories and digital assets (pictures, manuals, …). Pricing and discount information is usually kept in an ERP (Enterprise Resource Planning) tool. Both ERP and PIM synchronize their information to the e-commerce tool.
Once a customer purchases and checks out, they’ll pass through a payment gateway. Typically, the e-commerce tool is attached to one or more PSPs (Payment Service Providers). After checkout, the order needs to be fulfilled. This typically happens in an OMS (Order Management System). This also includes a delivery process with track & trace and return policies and eventually invoicing.
As you can see, there are a lot of tools to be considered. In most cases, e-commerce tools already bundle with some PIM, ERP and OMS features out of the box. These can work in trivial cases, but you should always validate if they support the more complex processes as well, such as split shipments, drop-shipping and personalization.
Now that you know the requirements of your platform, you can scan the market for a fitting solution and implementation partner. Although B2B e-commerce platforms have similarities with B2C platforms, it is important that the selected solution has specific B2B functionalities that fit your requirements. You can take a look at the two e-commerce platforms we offer as an example!
Furthermore, make sure that your e-commerce platform allows you to start small, but is scalable enough to grow together with your business.
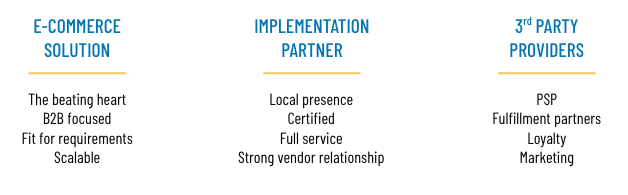
Your B2B e-commerce platform will not just work out of the box. It needs to integrate with your internal systems such as your ERP, CRM and your company website or customer portal. This is not something that you will do yourself. Reach out to an implementation partner that is certified in the product and offers you full service end-to-end: not just with the implementation, but also in the preliminary stage, the after-care and even in the change management process. Your implementation partner should be reachable for you, so ideally have a local presence. At the same time, the partner should have a strong relationship with the vendor of the product, so they can rely on the vendor’s expertise and support.
Apart from the solution and the partner, you probably need third-party services and tools to support it all. Think of Payment Service Providers, fulfillment partners, a loyalty system, outsourced marketing capacity, … Make sure these integrate well with the selected e-commerce solution and the expertise of the selected partner.
Don’t underestimate this step! Starting with B2B e-business will have an impact on your organization with its people, its roles and its processes. Some processes will need to be redrawn because the way of working in the online channel will differ from the existing offline business.
This change also needs to be reflected in the organizational chart and its roles. It is a very good idea to officially introduce an E-commerce Manager role within the organization, even if this role is assigned to an internal resource. The E-commerce manager will streamline actions for the online channel, and they therefore need to be backed by a team of content managers and online marketeers, apart from the purchasing, sales, fulfillment and customer service roles that are probably already in place in your company.
Rethinking the existing processes and defining and assigning new roles is not something you do overnight. It is an ongoing process that you fine-tune throughout the implementation phase.
Once your organization is prepared for the change, it is time to actually implement the e-commerce platform, together with your implementation partner. The implementation process should be iterative and incremental.
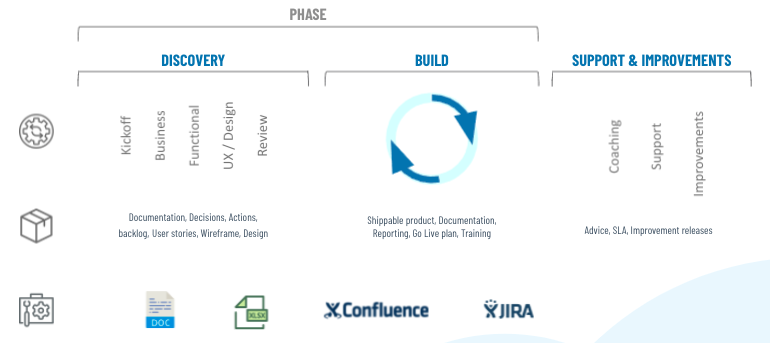
Your first task is to identify the different phases in the project. Think of what we said earlier: you want to start small. So start with identifying the absolute minimum viable product (MVP) that you can go live with.
For this MVP, identify the business and functional requirements and decide on the design. Then start building, but again: do it in small iterations, so you have room to adjust the scope and focus based on newly gained insights.
Go live with your first MVP and measure its success. This will give you valuable input for the upcoming MVPs of the platform.
Make sure you rely on your implementation partner for the after-care as well: get yourself properly coached and trained in using the platform, have a maintenance agreement in place which also leaves room for incremental improvements after the initial go-live.
You see that adopting e-commerce for your B2B business is quite a journey, but it’s really worth the effort. Many businesses already took the step and benefited greatly from it. So why wouldn’t you?
Hopefully, this blog post has given some guidance in the different steps that you need to take to get started with B2B e-commerce. We’ve greatly expanded on this topic in a whitepaper, which you can download for free.


In today's digital world, it's crucial to offer a smooth and personalized experience to your customers, no matter which channel they use to communicate with you. For this, Digital Experience Platforms (DXPs) are the solution. DXPs act as a central hu
Read more

We need to talk about the "illusion of speed” in the age of AI. In times where every post on LinkedIn seems to show that all your competitors are making a shift from traditional coding to 100% AI agentic software development, reality is somewhat more
Read more

Has your company already settled into the seats of first class, or have you not yet found your place on the AI train? Our AI expert Alexander Frimout explains which processes are ideally suited for your first AI business case. And why some companies
Read moreGet in touch with our experts today. They are happy to help!

Get in touch with our experts today. They are happy to help!
Get in touch with our experts today. They are happy to help!
Get in touch with our experts today. They are happy to help!
