
.png?auto=compress,webp&upscale=true&width=610&height=488&name=hubspot%20covers%20(4).png)
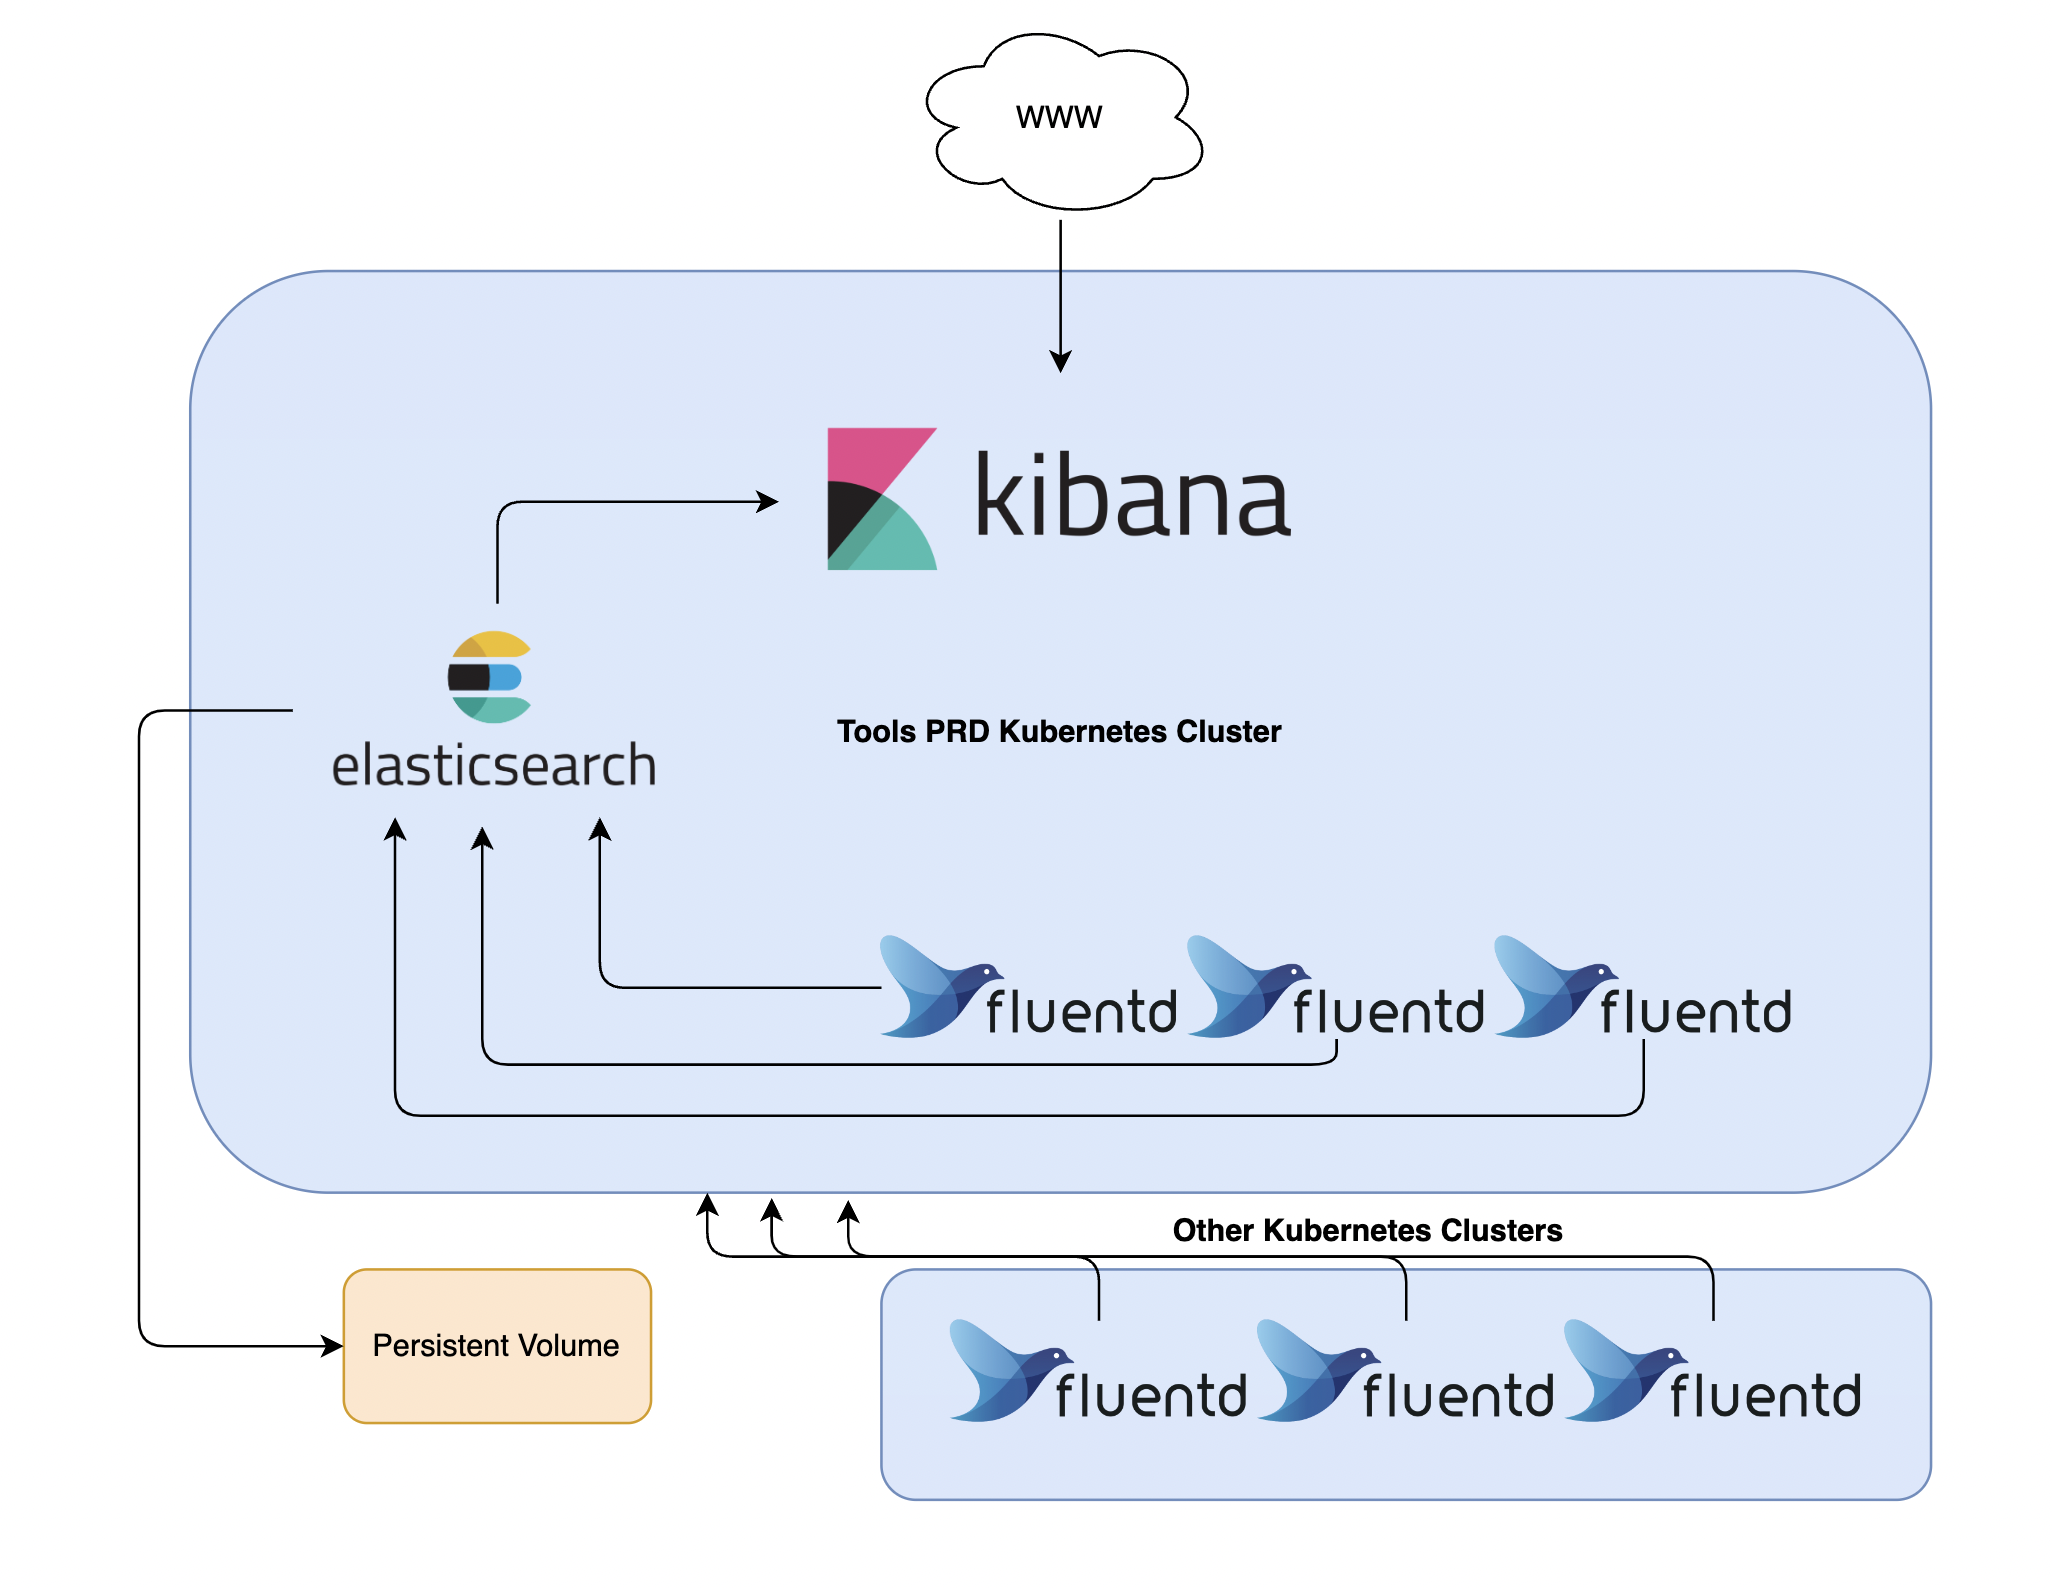
In this Kubernetes tutorial, you will learn how to setup an EFK stack on Kubernetes with xpack security feature turned on for log streaming, log analysis and log monitoring.
When running multiple applications and services on a Kubernetes cluster, it makes more sense to stream all of your Kubernetes Cluster logs to one centralized logging infrastructure for easy log analysis. This can help you quickly sort through and analyse the heavy volume of log data produced by your Pods. By enabling xpack security feature, you can create and manage: users, roles, views, .... . This gives the possibility to give certain permission to view, edit, create dashboard, ... for a subset of application logs (indexes).
One popular centralized logging solution is the Elasticsearch, Fluentd, and Kibana (EFK) stack.
What does each component do?
- Elasticsearch: captures incoming data and stores in Indexes.
- Fluentd: tails applications in your cluster and sends it directly to Elasticsearch.
- Kibana: makes it possible to view logs, run queries, create own dashboard, … from Elasticsearch Indexes (data).
Elastic recently stated that security features are distributed with the basic license by default.
Elastic released some security features for free as part of the default distribution (Basic license) starting in Elastic Stack 6.8 and 7.1. This new feature offering includes the ability to encrypt network traffic using SSL, create and manage users, define roles that protect index and cluster-level access and fully secure Kibana.

1. Prerequisites
Before we can begin with this guide, ensure you have the following things available to you:
- A Kubernetes 1.10+ cluster with role-based access control (RBAC) enabled.
- The kubectl command-line tool installed on your local machine, configured to connect to your cluster.
- (Optional) SealedSecret Controller deployed to the cluster and kubeseal installed on your local machine.
Once you have these components set up, you are ready to begin with this guide. Let's go!
2. Creating the Namespaces
Let's begin with creating the necessary namespaces for each application.
Elasticsearch namespace:
kind: Namespace
apiVersion: v1
metadata:
name: elasticsearch
group: elasticsearch
FluentD namespace:
kind: Namespace
apiVersion: v1
metadata:
name: fluentd
group: fluentd
Kibana namespace:
kind: Namespace
apiVersion: v1
metadata:
name: fluentd
group: fluentd
Once we have created the yaml files, we can deploy the yaml files to the cluster:
kubectl create -f elasticsearch.yaml -f kibana.yaml -f fluentd.yaml
Following output should appear:
namespace/elasticsearch created
namespace/kibana created
namespace/fluentd created
We can validate if the namespaces are successfully created by running the following command:
kubectl get namespaces
The following output should appear:
NAME STATUS AGE
default Active 15d
kube-system Active 15d
elasticsearch Active 1m
kibana Active 1m
fluentd Active 1m
3. Deploying Elasticsearch Statefulset
First we need to deploy Elasticsearch. Elasticsearch is the core component in the stack, Fluentd and Kibana can not work without ElasticSearch.
You can find more information about Elasticsearch by clicking this link: https://www.elastic.co/what-is/elasticsearch
3.1 Creating ServiceAccount
Let's first start with creating the RBAC resources. We will give the Elasticsearch ServiceAccount enough permission to explore the cluster and search for other Elasticsearch nodes.
apiVersion: v1
kind: ServiceAccount
metadata:
name: elasticsearch
namespace: elasticsearch
labels:
app: elasticsearch
We have our ServiceAccount, now we need to create the ClusterRole and bind it to the elasticsearch ServiceAccount.
kind: ClusterRole
apiVersion: rbac.authorization.k8s.io/v1
metadata:
name: elasticsearch
labels:
k8s-app: elasticsearch
kubernetes.io/cluster-service: "true"
addonmanager.kubernetes.io/mode: Reconcile
rules:
- apiGroups:
- ""
resources:
- "services"
- "namespaces"
- "endpoints"
verbs:
- "get"
Binding it to the ServiceAccount.
kind: ClusterRoleBinding
apiVersion: rbac.authorization.k8s.io/v1
metadata:
namespace: elasticsearch
name: elasticsearch
labels:
k8s-app: elasticsearch
kubernetes.io/cluster-service: "true"
addonmanager.kubernetes.io/mode: Reconcile
subjects:
- kind: ServiceAccount
name: elasticsearch
namespace: elasticsearch
apiGroup: ""
roleRef:
kind: ClusterRole
name: elasticsearch
apiGroup: ""
3.2 Creating Headless Services
For the next step, we need a Service resource in the cluster. We will create a Headless Service resource with name elasticsearch in the namespace elasticsearch. When we associate our Elasticsearch StatefulSet with this Service, the Service will return DNS A records (service-name.namespace.svc.cluster.local) from that point to Elasticsearch Pods with the app: elasticsearch label. We will later configure these DNS records to our Statefulset, so Elasticsearch will search for these nodes.
apiVersion: v1
kind: Service
metadata:
name: elasticsearch
namespace: elasticsearch
labels:
app: elasticsearch
spec:
selector:
app: elasticsearch
ports:
- name: rest
port: 9200
targetPort: 9200
- name: transport
port: 9300
targetPort: 9300
Let's deploy our yaml files to the cluster:
kubectl create -f Service.yaml -f ServiceAccount.yaml -f ClusterRole.yaml -f ClusterRoleBinding.yaml
Now let's see if the elasticsearch Service is deployed successfully:
kubectl get services -n elasticsearch
Following output should appear:
NAME TYPE CLUSTER-IP EXTERNAL-IP PORT(S) AGE
elasticsearch ClusterIP None <none> 9200/TCP,9300/TCP 1m
3.3 Creating Statefulset
apiVersion: apps/v1
kind: StatefulSet
metadata:
name: elasticsearch
namespace: elasticsearch
spec:
serviceName: elasticsearch
replicas: 3
updateStrategy:
type: OnDelete
selector:
matchLabels:
app: elasticsearch
template:
metadata:
labels:
app: elasticsearch
spec:
securityContext:
fsGroup: 1000
initContainers:
- name: increase-vm-max-map
image: busybox
imagePullPolicy: IfNotPresent
securityContext:
privileged: true
command: [ "sysctl", "-w", "vm.max_map_count=262144" ]
containers:
- name: elasticsearch
image: docker.elastic.co/elasticsearch/elasticsearch:8.3.2
env:
- name: node.name
valueFrom:
fieldRef:
fieldPath: metadata.name
- name: NODE_MASTER
valueFrom:
configMapKeyRef:
name: elasticsearch-config
key: NODE_MASTER
- name: NODE_DATA
valueFrom:
configMapKeyRef:
name: elasticsearch-config
key: NODE_DATA
- name: NUMBER_OF_MASTERS
valueFrom:
configMapKeyRef:
name: elasticsearch-config
key: NUMBER_OF_MASTERS
- name: NUMBER_OF_REPLICAS
valueFrom:
configMapKeyRef:
name: elasticsearch-config
key: NUMBER_OF_REPLICAS
- name: ES_JAVA_OPTS
valueFrom:
configMapKeyRef:
name: elasticsearch-config
key: ES_JAVA_OPTS
- name: ES_PORT
value: "9200"
- name: ELASTIC_PASSWORD
valueFrom:
secretKeyRef:
name: elastic-credentials
key: ELASTIC_PASSWORD
ports:
- containerPort: 9200
name: rest
protocol: TCP
- containerPort: 9300
name: transport
protocol: TCP
volumeMounts:
- name: elasticsearch-data
mountPath: /usr/share/elasticsearch/data
- name: elasticsearch-yml
mountPath: /usr/share/elasticsearch/config/elasticsearch.yml
subPath: elasticsearch.yml
resources:
requests:
cpu: "1000m"
memory: "2Gi"
limits:
cpu: "1000m"
memory: "2Gi"
volumes:
- name: elasticsearch-yml
configMap:
name: elasticsearch-config
items:
- key: elasticsearch.yml
path: elasticsearch.yml
volumeClaimTemplates:
- metadata:
name: elasticsearch-data
annotations:
volume.beta.kubernetes.io/storage-class: gp3
spec:
accessModes: [ "ReadWriteOnce" ]
resources:
requests:
storage: 50Gi
We have defined some environment variables in our Statefulset resources. Some of the variables are from ConfigMap and some from a Secret.
Secret contains the password of the Elasticsearch admin user.
Run the following command to create a yaml file for the elasticsearch admin password:
# Create SealedSecret for the admin elasticsearch password
kubectl -n elasticsearch create secret generic elastic-credentials \
--from-literal=ELASTIC_PASSWORD='STRONG-PASSWORD' \
--dry-run=client -o yaml | ${KUBESEAL_BINARY} --cert ${KUBESEAL_CERT_PATH} --format yaml > SealedSecret-ElasticCredentials.yaml
If you don't have a SealedSecret controller, you can make a Secret resource by running the following command:
# Create SealedSecret for the admin elasticsearch password
kubectl -n elasticsearch create secret generic elastic-credentials \
--from-literal=ELASTIC_PASSWORD='STRONG-PASSWORD' \
--dry-run=client -o yaml > SealedSecret-ElasticCredentials.yaml
The command above will create the yaml file that needs to be deployed to the cluster.
3.4 Creating ConfigMap
The Configmap contains elasticsearch.yml block with extra Elasticsearch configuration. We add our Service DNS records to our discovery.seed_hosts, Elasticsearch will search for additional nodes.
This block will be mounted on the pod under /usr/share/elasticsearch/config/elasticsearch.yml location.
apiVersion: v1
kind: ConfigMap
metadata:
name: elasticsearch-config
namespace: elasticsearch
data:
elasticsearch.yml: | cluster.name: "elasticsearch" bootstrap.memory_lock: false xpack.license.self_generated.type: basic network.host: "0.0.0.0" logger.org.elasticsearch.transport: error logger.org.elasticsearch.discovery: error discovery.seed_hosts: - elasticsearch-0.elasticsearch.elasticsearch.svc.cluster.local:9300 - elasticsearch-1.elasticsearch.elasticsearch.svc.cluster.local:9300 - elasticsearch-2.elasticsearch.elasticsearch.svc.cluster.local:9300 cluster.initial_master_nodes: - elasticsearch-0 - elasticsearch-1 - elasticsearch-2
NODE_MASTER: "true"
NODE_DATA: "true"
NUMBER_OF_MASTERS: "3"
NUMBER_OF_REPLICAS: "2"
This volume mount is also declared in statefulset.yaml:
volumeMounts:
- name: elasticsearch-data
mountPath: /usr/share/elasticsearch/data
- name: elasticsearch-yml
mountPath: /usr/share/elasticsearch/config/elasticsearch.yml
subPath: elasticsearch.yml
Deploy all your yaml files and make sure that Elasticsearch is running without any problems. If Elasticsearch is not running properly, you can tail the container logs or describe the Pod/Statefulset.
kubectl create -f ConfigMap.yaml -f Statefulset.yaml
The following output should appear:
configmap/elasticsearch-config created
statefulset/elasticsearch created
Let's see if the elasticsearch statefulset is deployed successfully.
kubectl get pod -n elasticsearch
Following output should appear:
NAMESPACE NAME READY STATUS RESTARTS AGE
elasticsearch elasticsearch-0 1/1 Running 0 2m
elasticsearch elasticsearch-1 1/1 Running 0 1m
elasticsearch elasticsearch-2 1/1 Running 0 30sc
3.5 Enabling xpack feature
3.5.1 Generate certificates
Elasticsearch will fail to start when the security feature is ON without security configuration is configured!
Before we can enable the security feature, we need to generate certificates for elasticsearch nodes. Elasticsearch nodes will communicate securely with each other.
Run the following commands in the elasticsearch container.
kubectl -n elasticsearch exec -ti elasticsearch-0 -- bash
# Create certificates
elasticsearch-certutil ca --out /tmp/elastic-stack-ca.p12 --pass ''
elasticsearch-certutil cert --name security-master --dns security-master --ca /tmp/elastic-stack-ca.p12 --pass '' --ca-pass '' --out /tmp/elastic-certificates.p12
# copy certificates to local machine
sudo kubectl cp elasticsearch/elasticsearch-0:/tmp/elastic-stack-ca.p12 ./elastic-stack-ca.p12
sudo kubectl cp elasticsearch/elasticsearch-0:/tmp/elastic-certificates.p12 ./elastic-certificates.p12
# Validate and extract PEM
openssl pkcs12 -nodes -passin pass:'' -in elastic-certificates.p12 -out elastic-certificate.pem
Once we have generated our certificate and copied it from the container to our local machine, we will create a SealedSecret from the PEM file. We will mount this PEM file to the container later.
# Create SealedSecret for the P12 file
kubectl -n elasticsearch create secret generic elastic-certificate-pem \
--from-file=elastic-certificates.p12 \
--dry-run=client -o yaml | ${KUBESEAL_BINARY} --cert ${KUBESEAL_CERT_PATH} --format yaml > SealedSecret-ElasticCertificates.yaml
If you don't have SealedSecret controller, you can make a Secret resource by running the following command.
# Create SealedSecret for the P12 file
kubectl -n elasticsearch create secret generic elastic-certificate-pem \
--from-file=elastic-certificates.p12 \
--dry-run=client -o yaml > SealedSecret-ElasticCertificates.yaml
The command above will create the yaml file that needs to be deployed to the cluster.
3.5.2 Enable xpack security features
When you have successfully created and deployed your certificate to the cluster, we can now enable security features.
Add the following configuration to the elasticsearch.yml configuration in the ConfigMap.yaml file:
xpack.license.self_generated.type: basic
xpack.security.enabled: true
xpack.security.transport.ssl.enabled: true
xpack.security.transport.ssl.verification_mode: certificate
xpack.security.transport.ssl.keystore.path: /usr/share/elasticsearch/config/certs/elastic-certificates.p12
xpack.security.transport.ssl.truststore.path: /usr/share/elasticsearch/config/certs/elastic-certificates.p12
xpack.security.http.ssl.enabled: false
xpack.security.http.ssl.truststore.path: /usr/share/elasticsearch/config/certs/elastic-certificates.p12
xpack.security.http.ssl.keystore.path: /usr/share/elasticsearch/config/certs/elastic-certificates.p12
Setting xpack.security.enabled to true will enable xpack security features. But only enabling this setting is not enough. We also need to mount and configure our newly generated certificates.
Mount the secret that contains the certificates to the StatefulSet:
volumeMounts:
- name: elasticsearch-data
mountPath: /usr/share/elasticsearch/data
- name: elasticsearch-yml
mountPath: /usr/share/elasticsearch/config/elasticsearch.yml
subPath: elasticsearch.yml
- name: elastic-certificates
mountPath: /usr/share/elasticsearch/config/certs
.....
.....
volumes:
- name: elasticsearch-yml
configMap:
name: elasticsearch-config
items:
- key: elasticsearch.yml
path: elasticsearch.yml
- name: elastic-certificates
secret:
secretName: elastic-certificates
Save and replace the ConfigMap and Statefulset. Wait till all pods have been terminated and started again.
if the pods are not restarted automatically, scale down statefulset and scale back up:
kubectl -n elasticsearch scale statefulset elasticsearch --replicas 0
#wait till all nodes are deleted
kubectl -n elasticsearch scale statefulset elasticsearch --replicas 3
Tail logs and make sure that Elasticsearch is running healthy. If Elasticsearch is not running properly, you can tail the container logs or describe the Pod/Statefulset.
Your ConfigMap.yaml and Statefulset.yaml file should look like this.
3.5.3 Statefulset
apiVersion: apps/v1
kind: StatefulSet
metadata:
name: elasticsearch
namespace: elasticsearch
spec:
serviceName: elasticsearch
replicas: 3
updateStrategy:
type: OnDelete
selector:
matchLabels:
app: elasticsearch
template:
metadata:
labels:
app: elasticsearch
spec:
securityContext:
fsGroup: 1000
initContainers:
- name: increase-vm-max-map
image: busybox
imagePullPolicy: IfNotPresent
securityContext:
privileged: true
command: [ "sysctl", "-w", "vm.max_map_count=262144" ]
containers:
- name: elasticsearch
image: "defined_in_kustomization"
env:
- name: node.name
valueFrom:
fieldRef:
fieldPath: metadata.name
- name: NODE_MASTER
valueFrom:
configMapKeyRef:
name: elasticsearch-config
key: NODE_MASTER
- name: NODE_DATA
valueFrom:
configMapKeyRef:
name: elasticsearch-config
key: NODE_DATA
- name: NUMBER_OF_MASTERS
valueFrom:
configMapKeyRef:
name: elasticsearch-config
key: NUMBER_OF_MASTERS
- name: NUMBER_OF_REPLICAS
valueFrom:
configMapKeyRef:
name: elasticsearch-config
key: NUMBER_OF_REPLICAS
- name: ES_JAVA_OPTS
valueFrom:
configMapKeyRef:
name: elasticsearch-config
key: ES_JAVA_OPTS
- name: ES_PORT
value: "9200"
- name: ELASTIC_PASSWORD
valueFrom:
secretKeyRef:
name: elastic-credentials
key: ELASTIC_PASSWORD
ports:
- containerPort: 9200
name: rest
protocol: TCP
- containerPort: 9300
name: transport
protocol: TCP
volumeMounts:
- name: elasticsearch-data
mountPath: /usr/share/elasticsearch/data
- name: elasticsearch-yml
mountPath: /usr/share/elasticsearch/config/elasticsearch.yml
subPath: elasticsearch.yml
- name: elastic-certificates
mountPath: /usr/share/elasticsearch/config/certs
resources:
requests:
cpu: "1000m"
memory: "2Gi"
limits:
cpu: "1000m"
memory: "2Gi"
volumes:
- name: elasticsearch-yml
configMap:
name: elasticsearch-config
items:
- key: elasticsearch.yml
path: elasticsearch.yml
- name: elastic-certificates
secret:
secretName: elastic-certificates
volumeClaimTemplates:
- metadata:
name: elasticsearch-data
annotations:
volume.beta.kubernetes.io/storage-class: gp3
spec:
accessModes: [ "ReadWriteOnce" ]
resources:
requests:
storage: 50Gi
3.5.3.1 readinessProbe
If you would like to add readinessprobe, add the following to your Statefulset.yaml:
readinessProbe:
exec:
command:
- /bin/bash
- -c
- |-
health=$(curl -s -o /dev/null -u elastic:${ELASTIC_PASSWORD} --write-out "%{http_code}" localhost:9200/_cluster/health?local=true)
if [[ ${health} -ne 200 ]]; then exit 1; fi
initialDelaySeconds: 5
3.5.4 ConfigMap
apiVersion: v1
kind: ConfigMap
metadata:
name: elasticsearch-config
namespace: elasticsearch
data:
elasticsearch.yml: | cluster.name: "elasticsearch" bootstrap.memory_lock: false xpack.license.self_generated.type: basic xpack.monitoring.collection.enabled: true xpack.security.http.ssl.enabled: false xpack.security.transport.ssl.enabled: true xpack.security.transport.ssl.verification_mode: certificate xpack.security.transport.ssl.keystore.path: /usr/share/elasticsearch/config/certs/elastic-certificates.p12 xpack.security.transport.ssl.truststore.path: /usr/share/elasticsearch/config/certs/elastic-certificates.p12 xpack.security.http.ssl.truststore.path: /usr/share/elasticsearch/config/certs/elastic-certificates.p12 xpack.security.http.ssl.keystore.path: /usr/share/elasticsearch/config/certs/elastic-certificates.p12 network.host: "0.0.0.0" logger.org.elasticsearch.transport: error logger.org.elasticsearch.discovery: error discovery.seed_hosts: - elasticsearch-0.elasticsearch.elasticsearch.svc.cluster.local:9300 - elasticsearch-1.elasticsearch.elasticsearch.svc.cluster.local:9300 - elasticsearch-2.elasticsearch.elasticsearch.svc.cluster.local:9300 cluster.initial_master_nodes: - elasticsearch-0 - elasticsearch-1 - elasticsearch-2
NODE_MASTER: "true"
NODE_DATA: "true"
NUMBER_OF_MASTERS: "3"
NUMBER_OF_REPLICAS: "2"
ES_JAVA_OPTS: "-Djava.net.preferIPv4Stack=true -Xms1750m -Xmx1750m"
4. Deploying Fluentd DaemonSet
Now it is time to send container logs to Elasticsearch. We already created our fluentD namespace.
You can find more information about FluentD by clicking on the following link: https://www.fluentd.org/
4.1 Creating ServiceAccount
Let's start again with creating the RBAC resources. We will give the FluentD ServiceAccount enough permission to explore the cluster and tail container logs.
apiVersion: v1
kind: ServiceAccount
metadata:
name: fluentd
namespace: fluentd
labels:
app: fluentd
Next, ClusterRole and bind it to the fluentd ServiceAccount.
apiVersion: rbac.authorization.k8s.io/v1
kind: ClusterRole
metadata:
name: fluentd
labels:
app: fluentd
rules:
- apiGroups:
- ""
resources:
- pods
- namespaces
verbs:
- get
- list
- watch
Now bind it to the ServiceAccount.
kind: ClusterRoleBinding
apiVersion: rbac.authorization.k8s.io/v1
metadata:
name: fluentd
roleRef:
kind: ClusterRole
name: fluentd
apiGroup: rbac.authorization.k8s.io
subjects:
- kind: ServiceAccount
name: fluentd
namespace: fluentd
4.2 Creating ConfigMap
apiVersion: v1
kind: ConfigMap
metadata:
name: fluentd-config
namespace: fluentd
data:
fluent.conf: | <match fluent.**> # this tells fluentd to not output its log on stdout @type null </match> # here we read the logs from Docker's containers and parse them <source> @type tail path /var/log/containers/*.log pos_file /var/log/app.log.pos tag kubernetes.* read_from_head true <parse> @type json time_format %Y-%m-%dT%H:%M:%S.%NZ </parse> </source> # we use kubernetes metadata plugin to add metadatas to the log <filter kubernetes.**> @type kubernetes_metadata </filter> # we send the logs to Elasticsearch <match **> @type elasticsearch_dynamic @log_level info include_tag_key true host "#{ENV['FLUENT_ELASTICSEARCH_HOST']}" port "#{ENV['FLUENT_ELASTICSEARCH_PORT']}" user "#{ENV['FLUENT_ELASTICSEARCH_USER']}" password "#{ENV['FLUENT_ELASTICSEARCH_PASSWORD']}" scheme "#{ENV['FLUENT_ELASTICSEARCH_SCHEME'] || 'http'}" ssl_verify "#{ENV['FLUENT_ELASTICSEARCH_SSL_VERIFY'] || 'true'}" reload_connections true logstash_format true logstash_prefix "#{ENV['K8S_NODE_NAME']}-${record['kubernetes']['pod_name']}" <buffer> @type file path /var/log/fluentd-buffers/kubernetes.system.buffer flush_mode interval retry_type exponential_backoff flush_thread_count 2 flush_interval 5s retry_forever true retry_max_interval 30 chunk_limit_size 2M queue_limit_length 32 overflow_action block </buffer> </match>
K8S_NODE_NAME: "efk-stack"
FLUENT_ELASTICSEARCH_USER: "elastic"
NUMBER_OF_REPLICAS: "2"
FLUENT_ELASTICSEARCH_HOST: "elasticsearch.elasticsearch.svc.cluster.local"
4.3 Creating DaemonSet
apiVersion: apps/v1
kind: DaemonSet
metadata:
name: fluentd
namespace: fluentd
labels:
app: fluentd
spec:
selector:
matchLabels:
app: fluentd
template:
metadata:
labels:
app: fluentd
spec:
serviceAccountName: fluentd
containers:
- name: fluentd
image: "defined_in_kustomization"
env:
- name: FLUENT_ELASTICSEARCH_HOST
valueFrom:
configMapKeyRef:
name: fluentd-config
key: FLUENT_ELASTICSEARCH_HOST
- name: FLUENT_ELASTICSEARCH_PORT
value: "9200"
- name: FLUENT_ELASTICSEARCH_SCHEME
value: "http"
- name: FLUENTD_SYSTEMD_CONF
value: disable
- name: K8S_NODE_NAME
valueFrom:
configMapKeyRef:
name: fluentd-config
key: K8S_NODE_NAME
- name: FLUENT_ELASTICSEARCH_USER
valueFrom:
configMapKeyRef:
name: fluentd-config
key: FLUENT_ELASTICSEARCH_USER
- name: FLUENT_ELASTICSEARCH_PASSWORD
valueFrom:
secretKeyRef:
name: fluentd-credentials
key: FLUENT_ELASTICSEARCH_PASSWORD
resources:
limits:
memory: 512Mi
requests:
cpu: 100m
memory: 200Mi
volumeMounts:
- name: varlog
mountPath: /var/log
- name: varlibdockercontainers
mountPath: /var/lib/docker/containers
readOnly: true
- name: fluentd-config
mountPath: /fluentd/etc
terminationGracePeriodSeconds: 30
volumes:
- name: varlog
hostPath:
path: /var/log
- name: varlibdockercontainers
hostPath:
path: /var/lib/docker/containers
- name: fluentd-config
configMap:
name: fluentd-config
items:
- key: fluent.conf
path: fluent.conf
The FLUENT_ELASTICSEARCH_PASSWORD is the same password we defined on Elasticsearch configuration (ELASTIC_PASSWORD).
Define the environment variables in the ConfigMap.yaml file, we also define some custom Fluentd configuration. This configuration will be mounted on the Fluentd container.
Deploy all your yaml files and make sure that Fluentd is running without any problems. If Fluentd is not running properly, you can tail the container logs or describe the Pod/DaemonSet.
5. Deploying Kibana Deployment
Now we have Storage (Elasticsearch) and Data stream (Fluentd). Next, we need Kibana to view / edit / … the data.
The configuration of Kibana is almost the same as Elasticsearch and Fluentd. We define some environment variables to create our Kibana configuration.
Mainly these configurations are:
- username and password of the kibana user,
- connection settings to Elastic search,
- same Elasticsearch Certificate are mounted
5.1 Creating Kibana credentials
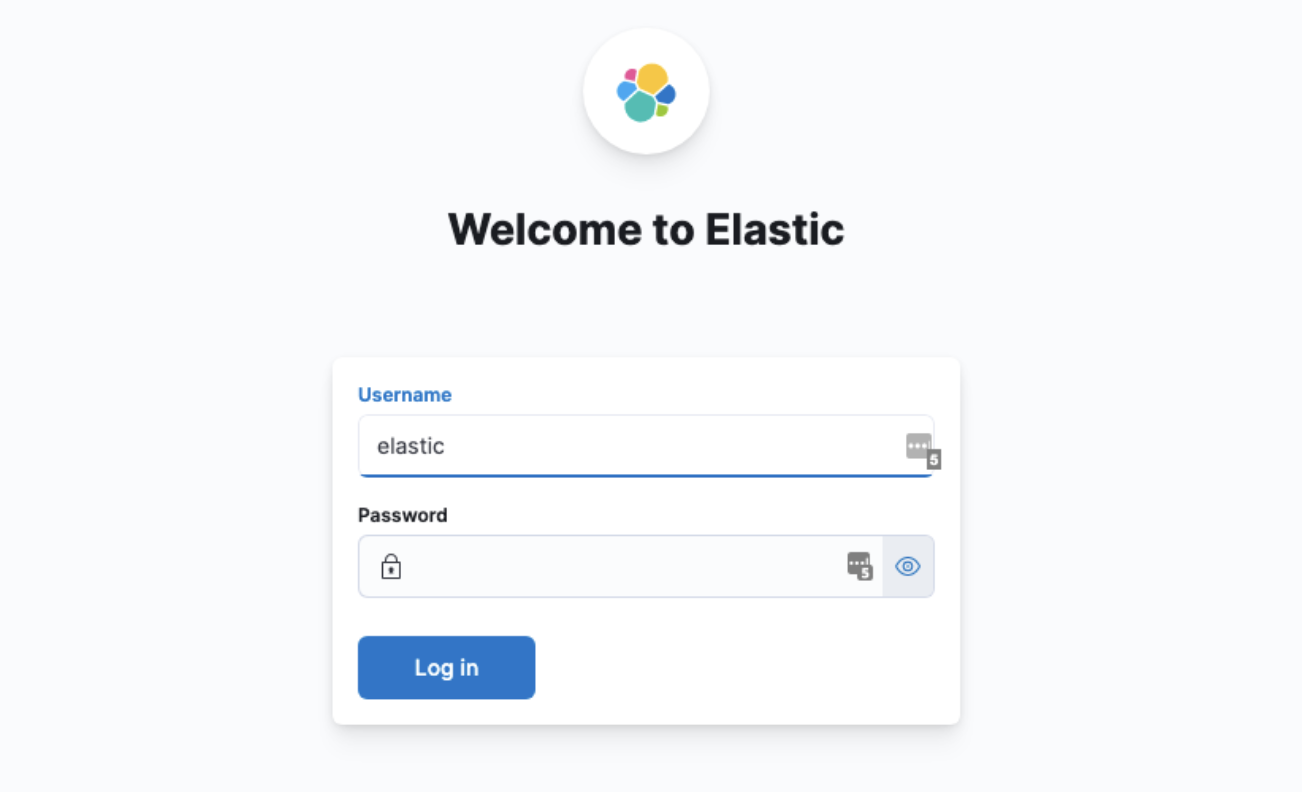
Kibana Username and Password
When we launch Kibana, the first question Kibana asks us is: "What is the username and password of the Kibana user". The username is kibana_system. The password can be retrieved from within the Elasticsearch container.
Exec to one of the Elasticsearch containers and run the following command:
kubectl -n elasticsearch exec -ti elasticsearch-0 -- bash
#This will generate a random string. Save the password!
./bin/elasticsearch-reset-password -u kibana_system
Create a and deploy SealedSecret with the given password:
kubectl -n kibana create secret generic kibana-credentials \
--from-literal=ELASTICSEARCH_PASSWORD='XXXXX' \
--dry-run=client -o yaml | ${KUBESEAL_BINARY} --cert ${KUBESEAL_CERT_PATH} --format yaml > SealedSecret-KibanaCredentials.yaml
If you don't have SealedSecret controller, you can make a Secret resource by running the following command.
kubectl -n kibana create secret generic kibana-credentials \
--from-literal=ELASTICSEARCH_PASSWORD='XXXXX' \
--dry-run=client -o yaml > SealedSecret-KibanaCredentials.yaml
The command above will create the yaml file that needs to be deployed to the cluster.
5.2 Creating Service
Now it is time to create the Service resource. Kibana will be accessible on port 5601 and use the app: kibana label to select the Service’s target Pods.
apiVersion: v1
kind: Service
metadata:
name: kibana
namespace: kibana
labels:
app: kibana
spec:
selector:
app: kibana
ports:
- name: http
port: 80
targetPort: 5601
5.3 Creating Deployment
Make sure that the ELASTICSEARCH_PASSWORD is defined in the environment variable and reads the right Secret.
We also need to create a new secret of the same PEM certificate we generated on the first step to mount on the container later.
# Create SealedSecret for the P12 file
kubectl -n kibana create secret generic elastic-certificate-pem \
--from-file=elastic-certificates.p12 \
--dry-run=client -o yaml | ${KUBESEAL_BINARY} --cert ${KUBESEAL_CERT_PATH} --format yaml > SealedSecret-KibanaCertificates.yaml
If you don't have SealedSecret controller, you can make a Secret resource by running the following command.
# Create SealedSecret for the P12 file
kubectl -n kibana create secret generic elastic-certificate-pem \
--from-file=elastic-certificates.p12 \
--dry-run=client -o yaml > SealedSecret-KibanaCertificates.yaml
The command above will create the yaml file that needs to be deployed to the cluster.
apiVersion: apps/v1
kind: Deployment
metadata:
name: kibana
namespace: kibana
labels:
app: kibana
spec:
replicas: 1
selector:
matchLabels:
app: kibana
template:
metadata:
labels:
app: kibana
spec:
affinity:
podAntiAffinity:
requiredDuringSchedulingIgnoredDuringExecution:
- labelSelector:
matchExpressions:
- key: app
operator: In
values:
- kibana
topologyKey: kubernetes.io/hostname
preferredDuringSchedulingIgnoredDuringExecution:
- weight: 100
podAffinityTerm:
labelSelector:
matchExpressions:
- key: app
operator: In
values:
- kibana
topologyKey: topology.kubernetes.io/zone
containers:
- name: kibana
image: docker.elastic.co/kibana/kibana:8.3.2
resources:
limits:
cpu: 1000m
requests:
cpu: 100m
env:
- name: ELASTICSEARCH_HOSTS
valueFrom:
configMapKeyRef:
name: kibana-config
key: ELASTICSEARCH_HOSTS
- name: SERVER_NAME
valueFrom:
configMapKeyRef:
name: kibana-config
key: SERVER_NAME
- name: ELASTICSEARCH_USERNAME
valueFrom:
configMapKeyRef:
name: kibana-config
key: ELASTICSEARCH_USERNAME
- name: ELASTICSEARCH_PASSWORD
valueFrom:
secretKeyRef:
name: kibana-credentials
key: ELASTICSEARCH_PASSWORD
ports:
- containerPort: 5601
name: http
protocol: TCP
volumeMounts:
- name: kibana-certificates
mountPath: /usr/share/kibana/config/certs
- name: kibana-yml
mountPath: /usr/share/kibana/config/kibana.yml
subPath: kibana.yml
volumes:
- name: kibana-certificates
secret:
secretName: kibana-certificates
- name: kibana-yml
configMap:
name: kibana-config
items:
- key: kibana.yml
path: kibana.yml
5.4 Creating ConfigMap
apiVersion: v1
kind: ConfigMap
metadata:
name: kibana-config
namespace: kibana
data:
kibana.yml: | # # ** THIS IS AN AUTO-GENERATED FILE ** # # Default Kibana configuration for docker target server.host: "0.0.0.0" server.shutdownTimeout: "5s" elasticsearch.hosts: [ "http://elasticsearch:9200" ] monitoring.ui.container.elasticsearch.enabled: true xpack.encryptedSavedObjects.encryptionKey: f9cd92d3834129433fb0404740b5e89c xpack.reporting.encryptionKey: e3de4fcf3fb5e6f973ce024121ead576 xpack.security.encryptionKey: 4afebd157537e0f1b2c0b8deddff6b68
SERVER_NAME: "kibana.example.com"
ELASTICSEARCH_HOSTS: "http://elasticsearch.elasticsearch.svc.cluster.local:9200"
ELASTICSEARCH_USERNAME: "kibana_system"
Deploy all configurations in the repository and tail the logs of Kibana.

And the Setup is Done!
You can now add your indexes, configure users, configure roles, ... and monitor your logs!
6. Conclusion
In this Kubernetes tutorial we’ve demonstrated how to set up and configure Elasticsearch, Fluentd, and Kibana (EFK Stack) on a Kubernetes cluster.
Centralize and make the life of the developers easy by exposing container logs in one centralized logging infrastructure!
If you enjoyed this tutorial and want more info about these topics in the future, make sure to follow us on LinkedIn!

What others have also read


CloudBrew has always been a highlight on our calendar, but the 2025 edition felt different. Perhaps it was the timing. Just the month prior, November 2025, the Azure Belgium Central region finally opened its doors. ACA has always operated from the he
Read more

Better uptime, lower costs, and avoiding vendor lock-in. These are three of the reasons why our customers opt for a multicloud strategy. Our Cloud Project Manager Roel Van Steenberghe explains what such a strategy entails and what the advantages of G
Read more

In the complex world of modern software development, companies are faced with the challenge of seamlessly integrating diverse applications developed and managed by different teams. An invaluable asset in overcoming this challenge is the Service Mesh.
Read moreWant to dive deeper into this topic?
Get in touch with our experts today. They are happy to help!

Want to dive deeper into this topic?
Get in touch with our experts today. They are happy to help!

Want to dive deeper into this topic?
Get in touch with our experts today. They are happy to help!

Want to dive deeper into this topic?
Get in touch with our experts today. They are happy to help!


