

Nowadays, loads of functionality that once got taken care of in the backend is shifting towards the frontend. As a frontend designer, I’ll show you how to create a simple SPA (Single Page Application) without the hassle of maintaining a backend.
What are we creating?

We will make a simple CRUD (Create, Read, Update, Delete) application in the form of a notes app. For this demo we are using: VueJS CLI, VueRouter, ElementUI and Google Firebase.
Please note that this is part one of a blogpost series. In this part we will set up Firebase, install VueJS locally via the command line interface, create the necessary views and set up the routing. Our database connection will be limited to ‘read’ only. Creating, updating and deleting notes via our app will be available soon in part two of the blogpost series.
Why VueJS?
There are many frameworks and technologies that may be suitable for this project, so choosing VueJS is a personal preference. I have chosen VueJS over other frameworks because:
- VueJS uses HTML templates, which makes it feel much more readable than for example JSX in React.
- Its learning curve is much more acceptable for frontend developers that lean more towards design than backend development, which is a great match for our creative team at ACA.
- Single file components (HTML/CSS/JS) and their great reusability.
- It comes with an integrated state manager (vuex) and router (vue-router) instead of relying on external libraries like for example redux.
- It’s lightweight and easily integratable in existing projects. Angular on its own is huge, and has a pretty steep learning curve. React’s approach just feels way too messy to me.
Then again, it also comes with some tradeoffs:
- It’s less adapted in the West. VueJS was created by Evan You, a former Google engineer. Evan has Chinese roots, and VueJS has a lot of market share in China. It may occur that you’ll come across some Chinese documentation if you are looking for third party addons.
- There aren’t as much VueJS jobs / developers available in Europe, although knowledge of the framework is getting more out there.
- It’s not backed / taken over by a multinational (yet), if you find that important. But it has a lot of Github contributions from a lot of people that simply love VueJS. It was the #1 most starred project on Github last year.
Why Firebase?
Firebase is a great service that lets you focus on what matters most: crafting fantastic user experiences. Using Firebase means you don’t need to manage servers or write APIs. Firebase can be your hosting, authentication tool, API and datastore. It can be modified to suit a lot of your needs and besides that, it can perfectly scale along with your project as it grows over time.
The ‘Spark’ plan, which is completely free, offers you up to 100 simultaneous connections, 1GB storage and a 10GB download limit. Enough for a small project, startups or for indie developers that want their idea(s) validated.
Creating the application
Depending on your skill level, the following steps will take you approximately 30 to 60 minutes to complete.
Step 1: Setting up our Firebase environment
Head over to https://firebase.google.com/ and sign up with your Google account. Once that’s done, head over to the Firebase console and create a new project. I named mine ‘FireNotes’.

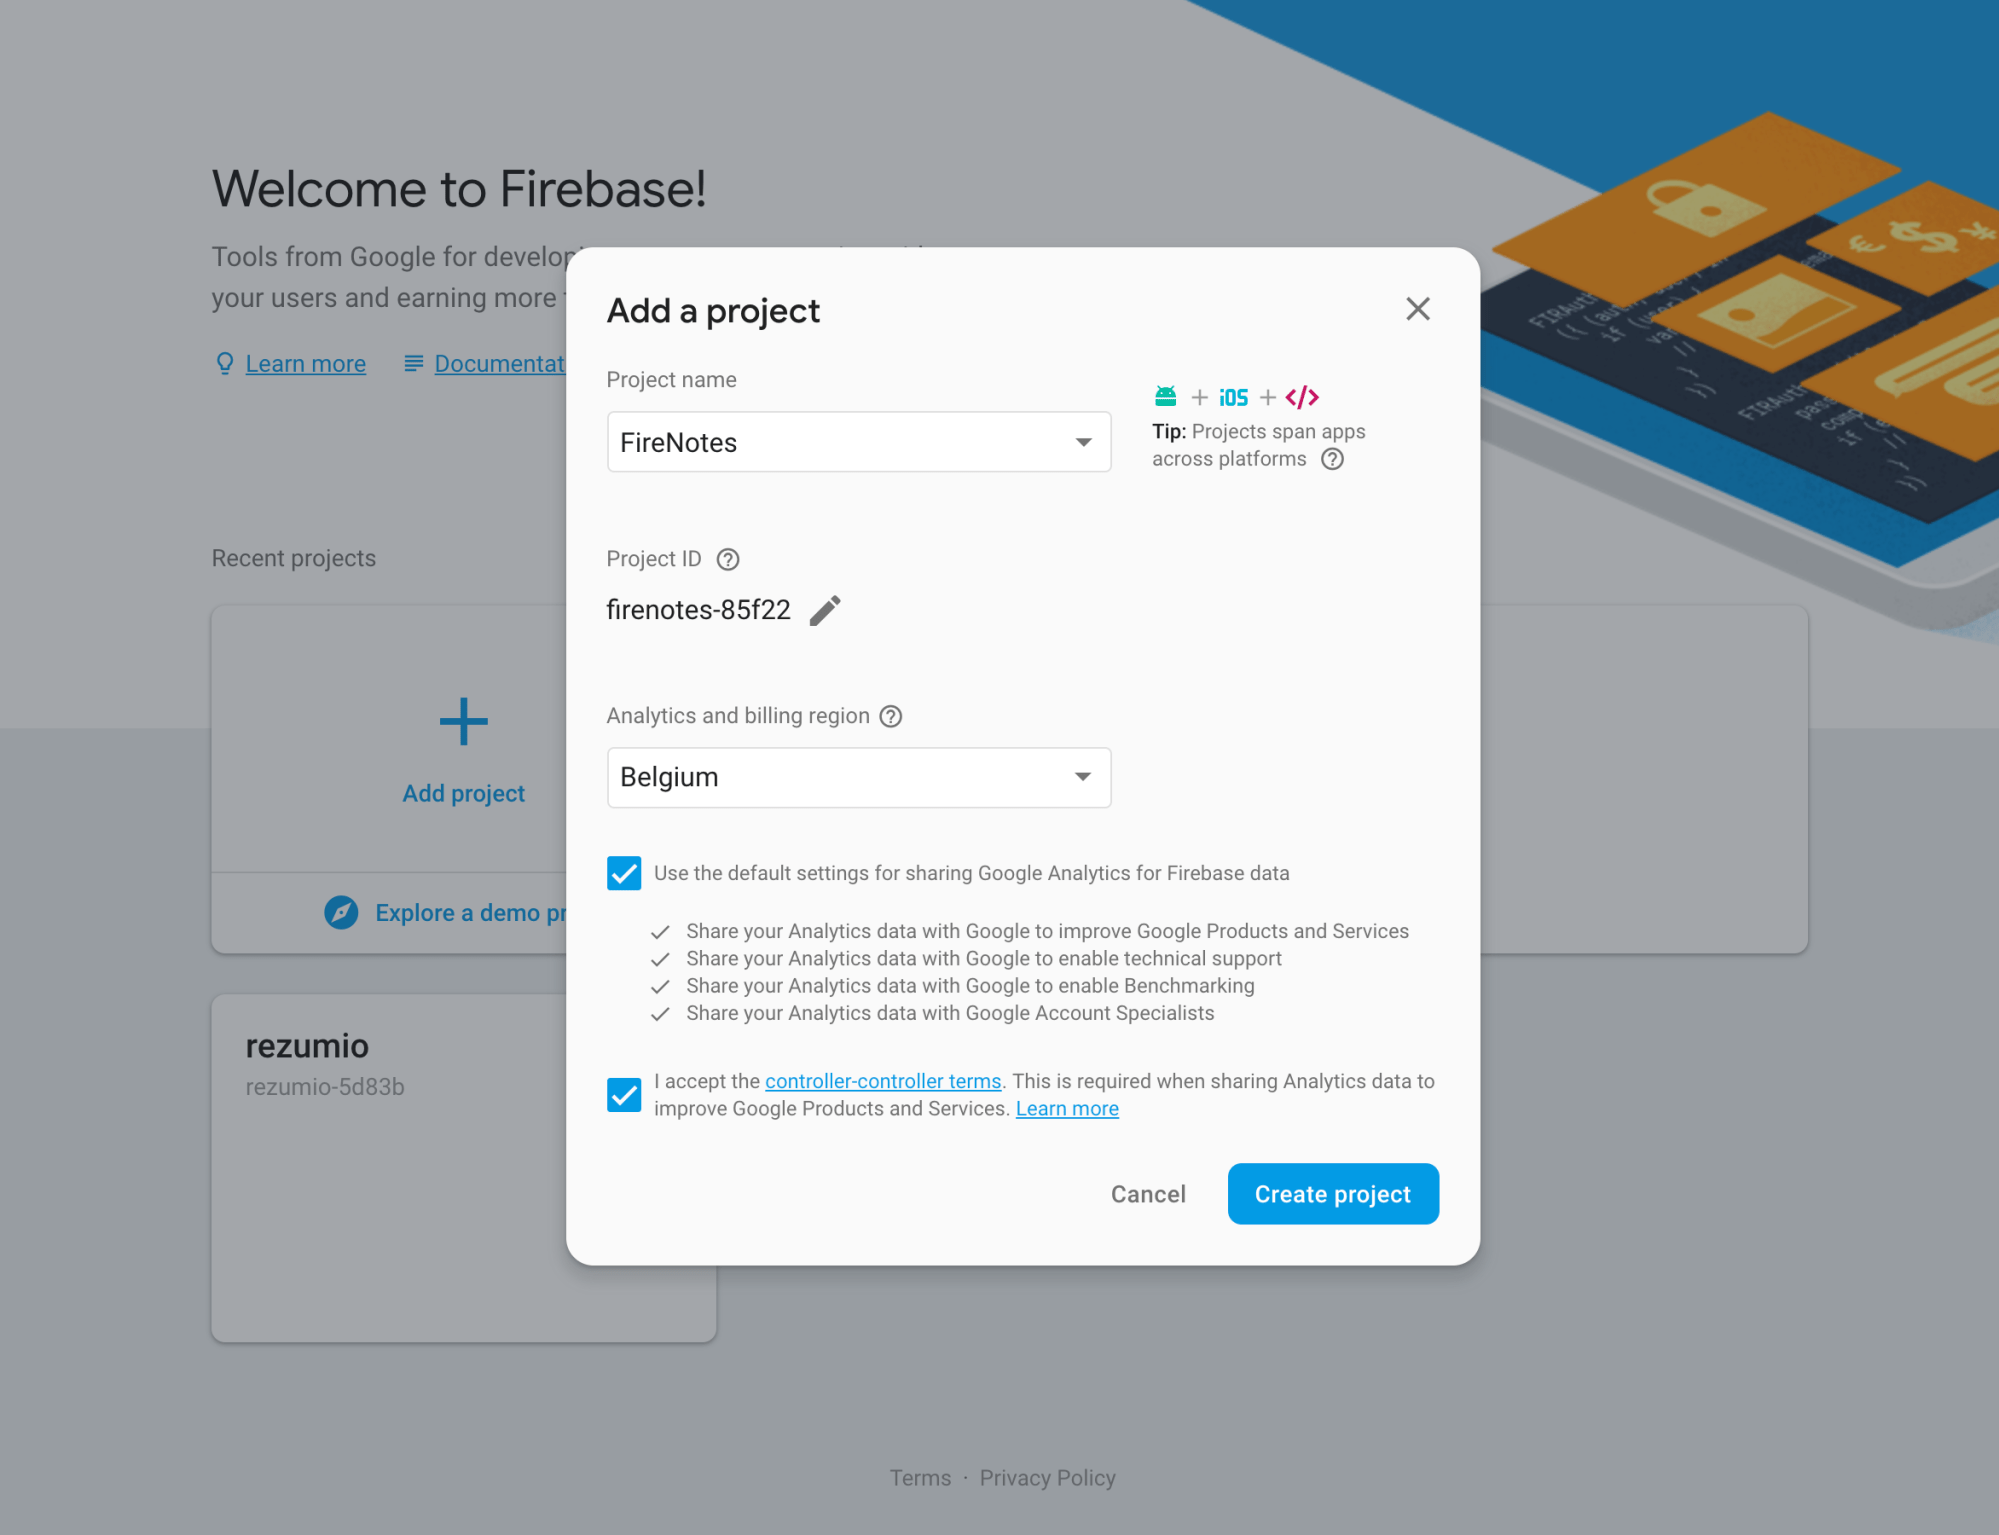
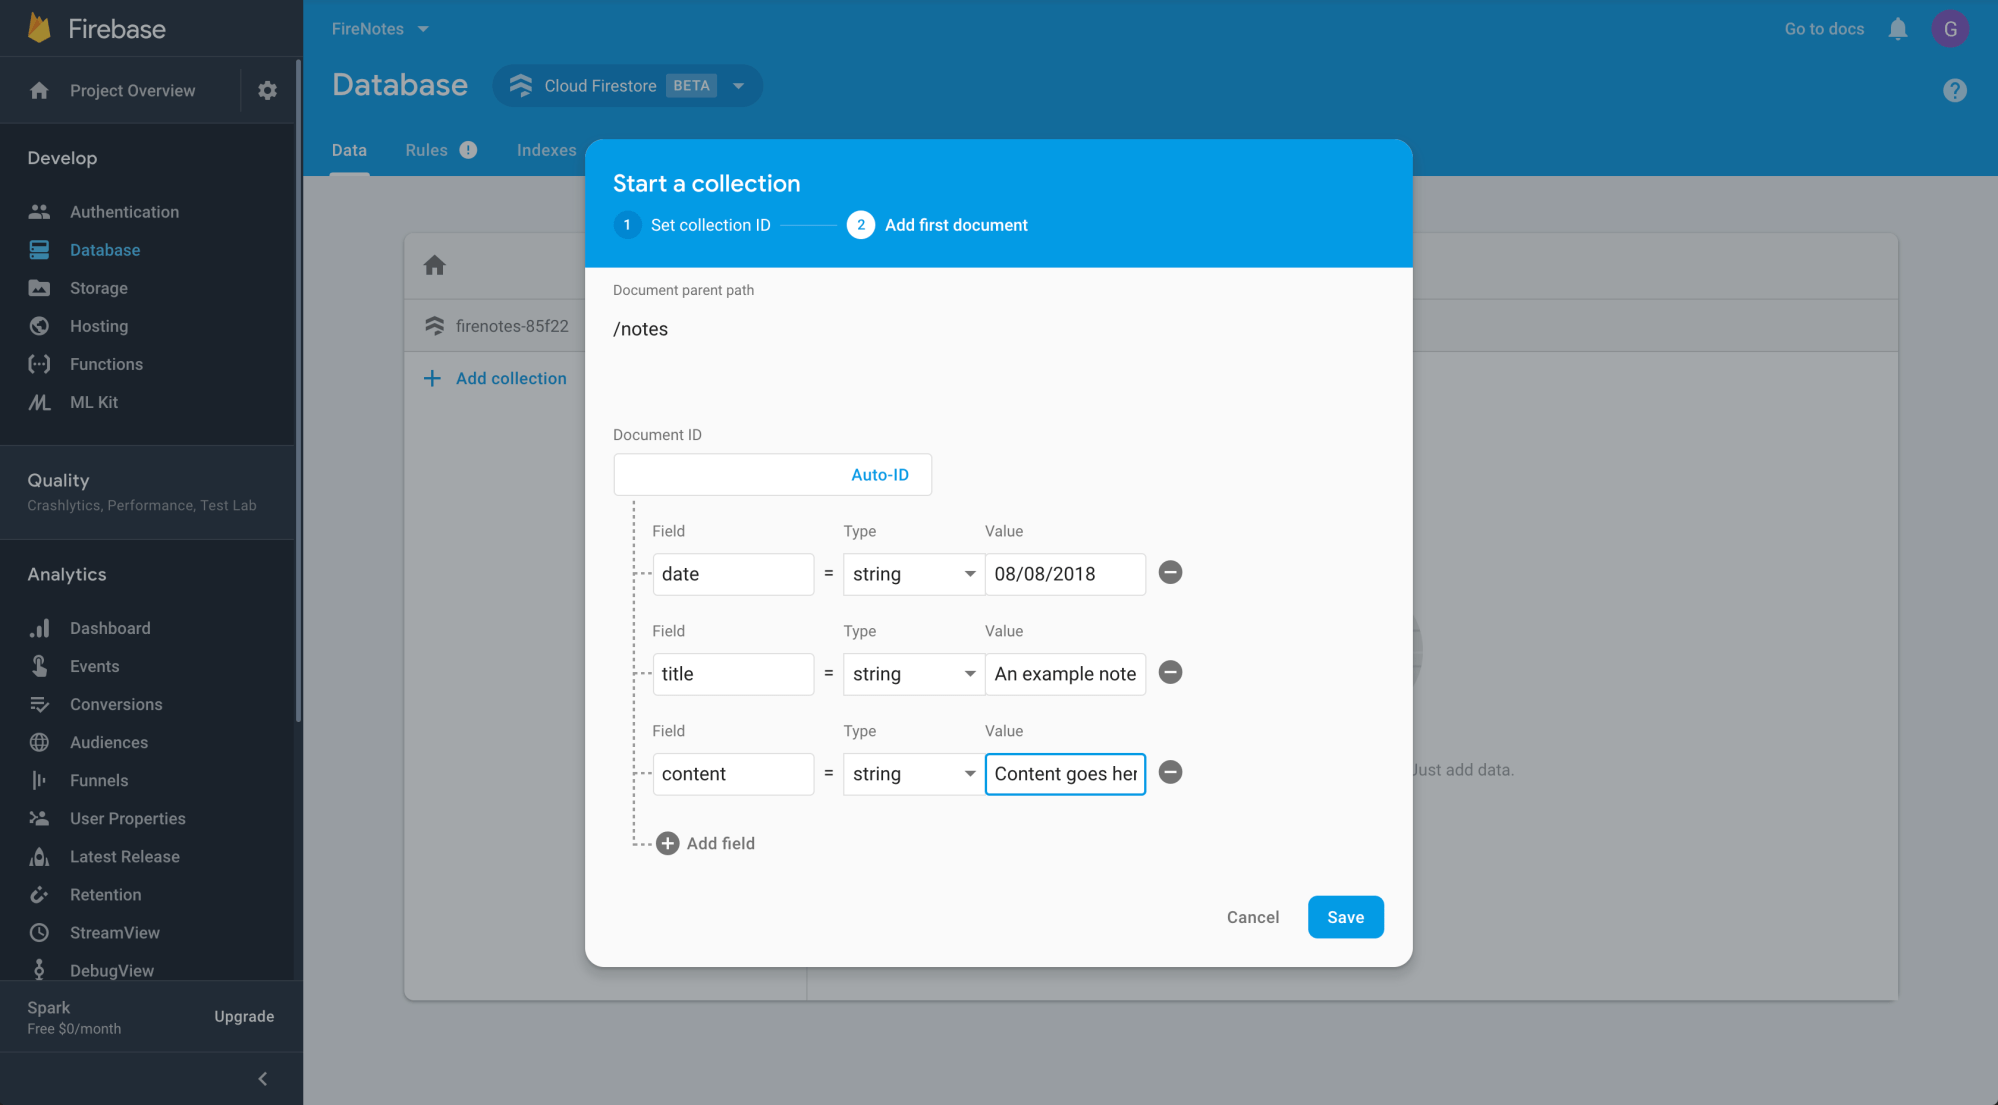
Since we will be using the Firestore database, head over to the ‘Database’ tab in the sidebar under the ‘Develop’ section and enable database usage in test mode*, as seen below.

* Important notice: this will give everybody access to your database. If you plan on releasing a project with Firebase, please dig further into the documentation of database permissions and set it up properly.
Next up, let’s add some notes in our database. Add a new collection and name it ‘notes’. This will be the parent collection where all our notes live. Populate it with some dummy notes like the screenshot below, containing an automatic ID, post date, title and content:

Step 2: Setting up our VueJS Project
Fairly easy so far, right? Let’s shift the focus on our application now.
Open up your console and navigate to your projects folder. Assuming you already have NPM installed, just install Vue CLI via the following command:
npm install -g @vue/cli
Next, let’s kickstart your project using the following command:
vue create firenotes
This will prompt you with a choice for default or manual preset. For now, let’s start with the default option with NPM. Once installed, head over to your firenotes folder and start your webserver with following command:
npm run serve
If you navigate to the provided IP address (normally localhost:8080), you will see the standard ‘hello world’ view Vue provides:

Step 3: Creating the main layout
Next, let’s visualize what our application should look like. I’m not going through styling details in this blogpost, so I’ll use the ElementUI kit to speed things up.
# In your ~/projects/appname folder
npm install element-ui -S
Head over to /src/main.js and add the ElementUI imports, and register it into our VueJS app, right below the ‘import Vue’ as shown below:
import Vue from 'vue'
import ElementUI from 'element-ui'
import 'element-ui/lib/theme-chalk/index.css'
Vue.use(ElementUI)
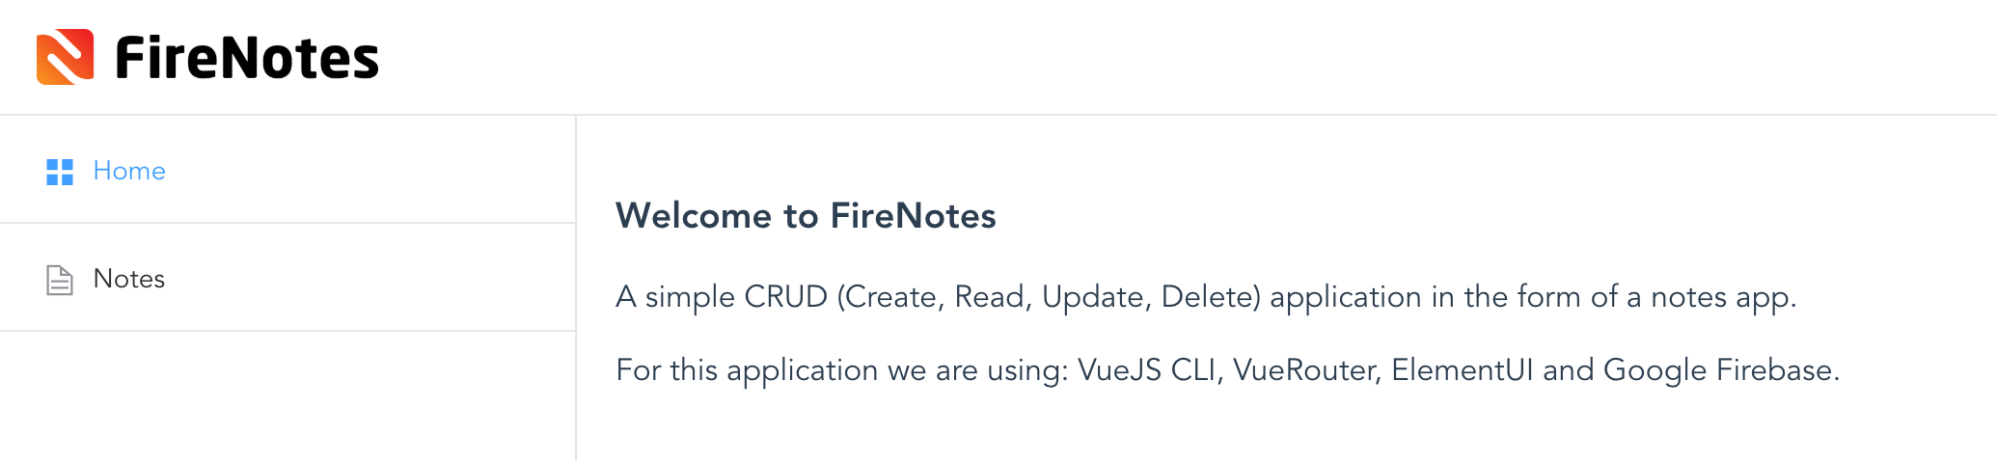
Now we can start using ElementUI components in our templates. I’ve replaced the Vue logo with my own (download here), and changed the App.vue template as follows:
<template>
<div id="app">
<el-container>
<el-header>
<img class="logo" src="./assets/logo.png" />
</el-header>
<el-container>
<el-aside width="300px">
<el-menu
default-active="home"
class="el-menu-vertical-demo">
<el-menu-item index="home">
<i class="el-icon-menu"></i>
<span>Home</span>
</el-menu-item>
<el-menu-item index="notes">
<i class="el-icon-document"></i>
<span>Notes</span>
</el-menu-item>
</el-menu>
</el-aside>
<el-main>
<h1>Welcome to FireNotes</h1>
<p>A simple CRUD (Create, Read, Update, Delete) application in the form of a notes app.</p>
<p>For this application we are using: VueJS CLI, VueRouter, ElementUI and Google Firebase.</p>
</el-main>
</el-container>
</el-container>
</div>
</template>
<script>
export default {
name: 'App'
}
</script>
<style>
html, body { margin: 0; }
#app {
font-family: 'Avenir', Helvetica, Arial, sans-serif;
-webkit-font-smoothing: antialiased;
-moz-osx-font-smoothing: grayscale;
color: #2c3e50;
}
.el-header { border-bottom: 1px solid #e6e6e6; display: flex; align-items: center; width: 100%; }
.el-header button { float: right; }
.el-menu-item { border-bottom: 1px solid #e6e6e6; }
.logo { max-width: 50%; max-height: 50%; margin-right: auto; }
</style>
Which makes it look like:

Step 4: Setting up our routes
So far so good! Next we can install vue-router, which is the official VueJS router. It deeply integrates with your VueJS application’s core, making single page applications a breeze. With vue-router we will be able to navigate to our notes page, which we will set up later.
# In your ~/projects/appname folder
npm install vue-router
Just like ElementUI, the vue-router needs to be imported and registered within our VueJS app. Head over to main.js and replace it with following code:
import Vue from 'vue'
import ElementUI from 'element-ui'
import 'element-ui/lib/theme-chalk/index.css'
Vue.use(ElementUI)
import VueRouter from 'vue-router'
Vue.use(VueRouter)
import App from '@/App'
import HelloWorld from '@/components/HelloWorld'
import Notes from '@/components/Notes'
const routes = [
{
path: '*',
redirect: '/home'
},
{
path: '/',
redirect: '/home'
},
{
path: '/home',
name: 'HelloWorld',
component: HelloWorld
},
{
path: '/notes',
name: 'Notes',
component: Notes
},
]
const router = new VueRouter({
routes
})
new Vue({
el: '#app',
router: router,
render: h => h(App),
components: { App }
})
What happened here? Basically, we have specified the URLs of our two navigation items and assigned them to two different components. We’ve also included rules to automatically go to the homepage on load or whenever a URL triggers a non-registered route. Last but not least, we’ve registered the routes via ‘new VueRouter’, which is now embedded into our application core as it gets passed onto our ‘new Vue’ instance.
Now, saving this will probably cause some errors, since we didn’t do any work on the notes component yet. Let’s create a simple Notes.vue file inside the components folder.
<template>
<div class="notes">
Notes will go here
</div>
</template>
<script>
export default {
name: 'Notes'
}
</script>
Next, we need our app to display the correct components based on these specified routes. This will require some changes to our App.vue file on both the navigation and the content panel (el-main).
<template> <div id="app"> <el-container> <el-header> <img class="logo" src="./assets/logo.png" /> </el-header> <el-container> <el-aside width="300px"> <el-menu default-active="home" :router="true" class="el-menu-vertical-demo"> <el-menu-item index="home"> <i class="el-icon-menu"></i> <span>Home</span> </el-menu-item> <el-menu-item index="notes"> <i class="el-icon-document"></i> <span>Notes</span> </el-menu-item> </el-menu> </el-aside> <el-main> <router-view/> </el-main> </el-container> </el-container> </div> </template> <script> export default {
name: 'App'
}
</script> <style> html, body { margin: 0; }
#app {
font-family: 'Avenir', Helvetica, Arial, sans-serif;
-webkit-font-smoothing: antialiased;
-moz-osx-font-smoothing: grayscale;
color: #2c3e50;
}
.el-header { border-bottom: 1px solid #e6e6e6; display: flex; align-items: center; width: 100%; }
.el-header button { float: right; }
.el-menu-item { border-bottom: 1px solid #e6e6e6; }
.logo { max-width: 50%; max-height: 50%; margin-right: auto; }
</style>
Here we added router=”true” to the component, which enables the ’s indexes to be used as ‘path’ to activate the route action. We also moved the introduction heading and paragraphs to HelloWorld.vue (you should too ;-)) and replaced it with <router-view/>. Now the router is fully responsible for which component is shown inside that panel. Awesome!
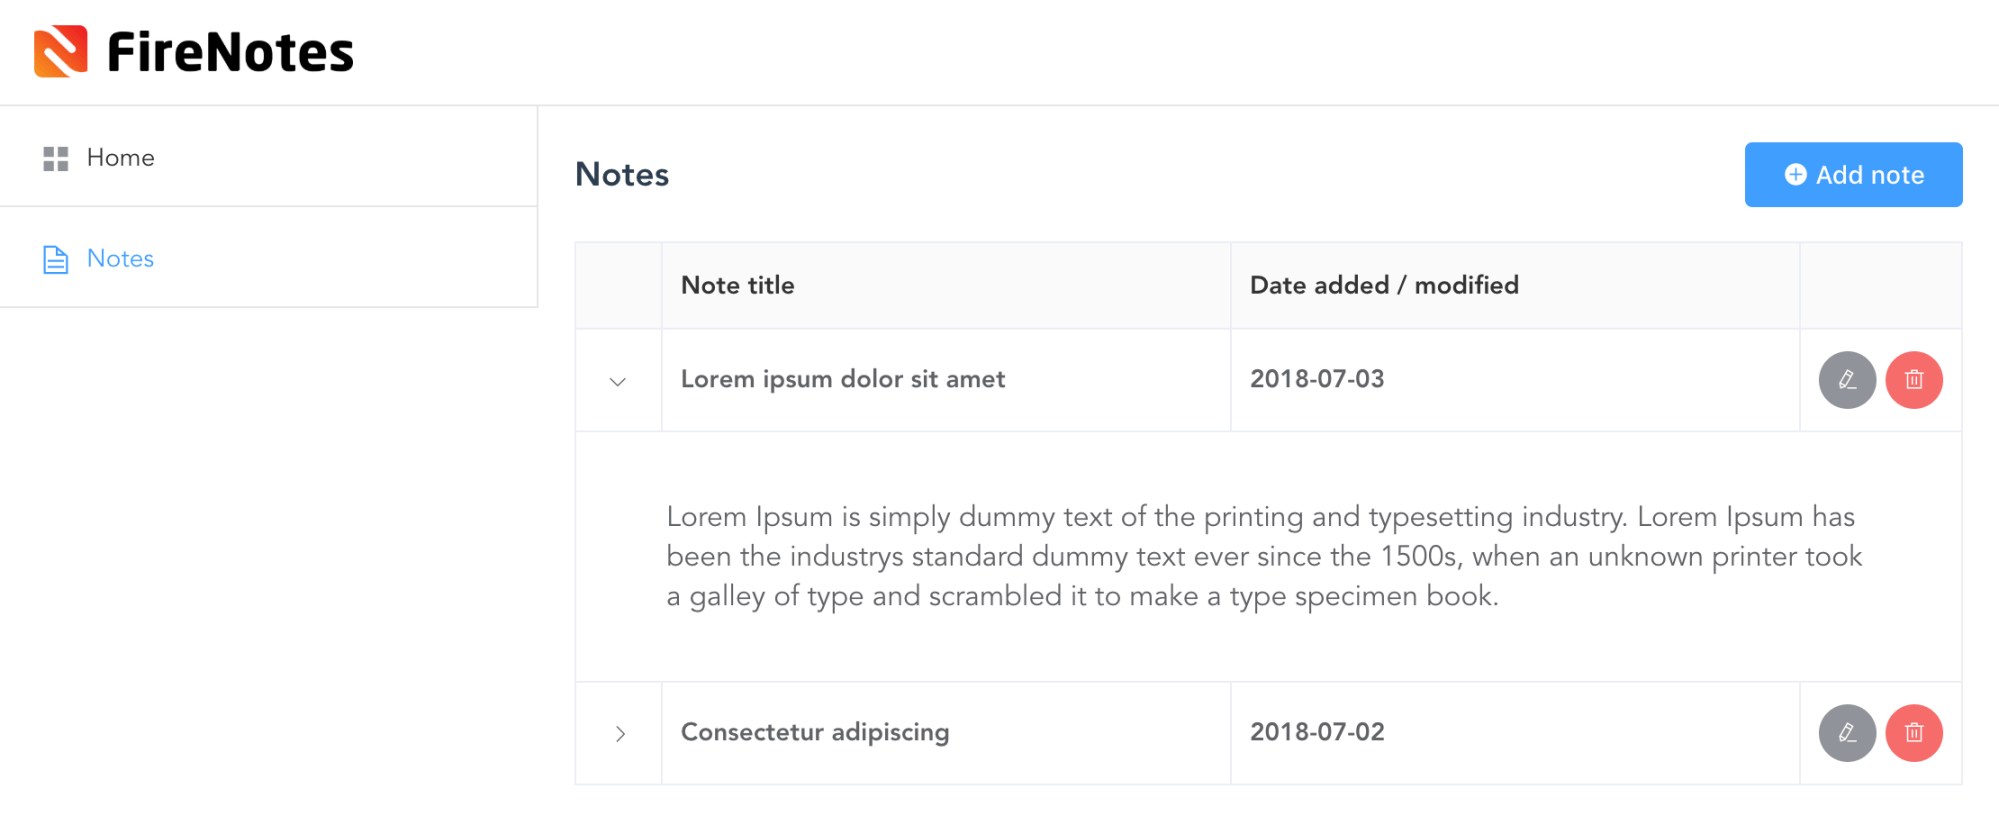
Next up we’ll tweak Notes.vue to actually display notes. For now, all content is static. Later, we will populate the notes table with data from our Firestore database.
<template> <div class="notes"> <h1> Notes <el-button type="primary" size="medium"><i class="el-icon-circle-plus"></i> Add note</el-button> </h1> <el-table :data="tableData" border> <el-table-column type="expand"> <template slot-scope="props"> <p>{{ props.row.details }}</p> </template> </el-table-column> <el-table-column label="Note title"> <template slot-scope="props">
{{ props.row.name }}
</template> </el-table-column> <el-table-column label="Date added / modified" prop="date"> </el-table-column> <el-table-column fixed="right" label="" width="90"> <template slot-scope="scope"> <el-button type="info" size="small" icon="el-icon-edit" circle></el-button> <el-button type="danger" size="small" icon="el-icon-delete" circle style="margin-left: 5px;"></el-button> </template> </el-table-column> </el-table> </div> </template> <script> export default {
name: 'Notes', data() {
return {
tableData: [{
date: '2018-07-03',
name: 'Lorem ipsum dolor sit amet',
details: 'Lorem Ipsum is simply dummy text of the printing and typesetting industry. Lorem Ipsum has been the industrys standard dummy text ever since the 1500s, when an unknown printer took a galley of type and scrambled it to make a type specimen book.'
}, {
date: '2018-07-02',
name: 'Consectetur adipiscing',
details: 'Lorem Ipsum is simply dummy text of the printing and typesetting industry. Lorem Ipsum has been the industrys standard dummy text ever since the 1500s, when an unknown printer took a galley of type and scrambled it to make a type specimen book.'
}]
};
}
}
</script> <style> h1 { margin-top: 0; display: flex; align-items: center; width: 100%; }
.el-button { margin-left: auto; }
.el-collapse-item__header { font-size: 16px; }
.el-table { font-size: 14px; font-weight: 700; }
.el-table__expanded-cell p { font-size: 16px; font-weight: 400; }
.el-table th { background: #fafafa; }
.el-table th > .cell { color: #333; }
</style>
Which makes it look like:

Step 5: Coupling Firebase with our project
Great! Now everything is in place for us to transform the static application to a Firestore data driven application. Let’s install the dependencies in order to connect with Firebase:
# In your ~/projects/appname folder
npm install firebase
import firebase from 'firebase'
import 'firebase/firestore'
firebase.initializeApp({
apiKey: '',
projectId: ''
})
export const db = firebase.firestore()
const settings = { timestampsInSnapshots: true }
db.settings(settings)
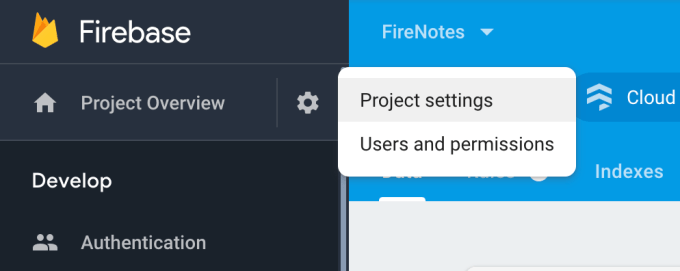
Here you still need to populate ‘apiKey’ and ‘projectId’, which can be found under the Project settings link via the cogwheel:

Next, head over to the Notes.vue component where we will empty the static array of notes and fill it with the ones we created in our Firestore database earlier on. We also defined an empty-text on the table, which will be shown while data is being loaded into our table.
<template> <div class="notes"> <h1> Notes <el-button type="primary" size="medium"><i class="el-icon-circle-plus"></i> Add note</el-button> </h1> <el-table :data="tableData" empty-text="Loading, or no records to be shown." border> <el-table-column type="expand"> <template slot-scope="props"> <p>{{ props.row.content }}</p> </template> </el-table-column> <el-table-column label="Note title"> <template slot-scope="props">
{{ props.row.title }}
</template> </el-table-column> <el-table-column label="Date added / modified" prop="date"> </el-table-column> <el-table-column fixed="right" label="" width="90"> <template slot-scope="scope"> <el-button type="info" size="small" icon="el-icon-edit" circle></el-button> <el-button type="danger" size="small" icon="el-icon-delete" circle style="margin-left: 5px;"></el-button> </template> </el-table-column> </el-table> </div> </template> <script> import { db } from '@/main' export default {
name: 'Notes', data() {
return {
tableData: []
}
}, created () {
db.collection('notes').get().then(querySnapshot => {
querySnapshot.forEach(doc => {
const data = {
'id': doc.id,
'date': doc.data().date,
'title': doc.data().title,
'content': doc.data().content
}
this.tableData.push(data)
})
})
}
}
</script> <style> h1 { margin-top: 0; display: flex; align-items: center; width: 100%; }
.el-button { margin-left: auto; }
.el-collapse-item__header { font-size: 16px; }
.el-table { font-size: 14px; font-weight: 700; }
.el-table__expanded-cell p { font-size: 16px; font-weight: 400; }
.el-table th { background: #fafafa; }
.el-table th > .cell { color: #333; }
</style>
This makes the notes we manually added earlier in our Firestore database to be seen in our application making it a little bit less static. Great success!

What’s next?
In our follow-up blog post on this subject, we dig further into the remaining functionalities: creating, updating and deleting notes in our Firebase database, completely controlled by our VueJS app. Since we had a question in the comments on login functionality, we also added that as a bonus!

What others have also read


In software development, assumptions can have a serious impact and we should always be on the look-out. In this blog post, we talk about how to deal with assumptions when developing software. Imagine…you’ve been driving to a certain place A place you have been driving to every day for the last 5 years, taking the same route, passing the same abandoned street, where you’ve never seen another car. Gradually you start feeling familiar with this route and you assume that as always you will be the only car on this road. But then at a given moment in time, a car pops up right in front of you… there had been a side street all this time, but you had never noticed it, or maybe forgot all about it. You hit the brakes and fortunately come to a stop just in time. Assumption nearly killed you. Fortunately in our job, the assumptions we make are never as hazardous to our lives as the assumptions we make in traffic. Nevertheless, assumptions can have a serious impact and we should always be on the look-out. Imagine… you create websites Your latest client is looking for a new site for his retirement home because his current site is outdated and not that fancy. So you build a Fancy new website based on the assumption that Fancy means : modern design, social features, dynamic content. The site is not the success he had anticipated … strange … you have build exactly what your client wants. But did you build what the visitors of the site want? The average user is between 50 – 65 years old, looking for a new home for their mom and dad. They are not digital natives and may not feel at home surfing on a fancy, dynamic website filled with twitter feeds and social buttons. All they want is to have a good impression of the retirement home and to get reassurance of the fact that they will take good care of their parents. The more experienced you’ll get, the harder you will have to watch out not to make assumptions and to double-check with your client AND the target audience . Another well known peril of experience is “ the curse of knowledge “. Although it sounds like the next Pirates of the Caribbean sequel, the curse of knowledge is a cognitive bias that overpowers almost everyone with expert knowledge in a specific sector. It means better-informed parties find it extremely difficult to think about problems from the perspective of lesser-informed parties. You might wonder why economists don’t always succeed in making the correct stock-exchange predictions. Everyone with some cash to spare can buy shares. You don’t need to be an expert or even understand about economics. And that’s the major reason why economists are often wrong. Because they have expert knowledge, they can’t see past this expertise and have trouble imagining how lesser informed people will react to changes in the market. The same goes for IT. That’s why we always have to keep an eye out, we don’t stop putting ourselves in the shoes of our clients. Gaining insight in their experience and point of view is key in creating the perfect solution for the end user. So how do we tackle assumptions …? I would like to say “Simple” and give you a wonderful oneliner … but as usual … simple is never the correct answer. To manage the urge to switch to auto-pilot and let the Curse of Knowledge kick in, we’ve developed a methodology based on several Agile principles which forces us to involve our end user in every phase of the project, starting when our clients are thinking about a project, but haven’t defined the solution yet. And ending … well actually never. The end user will gain new insights, working with your solution, which may lead to new improvements. In the waterfall methodology at the start of a project an analysis is made upfront by a business analist. Sometimes the user is involved of this upfront analysis, but this is not always the case. Then a conclave of developers create something in solitude and after the white smoke … user acceptance testing (UAT) starts. It must be painful for them to realise after these tests that the product they carefully crafted isn’t the solution the users expected it to be. It’s too late to make vigorous changes without needing much more time and budget. An Agile project methodology will take you a long way. By releasing testable versions every 2 to 3 weeks, users can gradually test functionality and give their feedback during development of the project. This approach will incorporate the user’s insights, gained throughout the project and will guarantee a better match between the needs of the user and the solution you create for their needs. Agile practitioners are advocating ‘continuous deployment’; a practice where newly developed features will be deployed immediately to a production environment instead of in batches every 2 to 3 weeks. This enables us to validate the system (and in essence its assumptions) in the wild, gain valuable feedback from real users, and run targeted experiments to validate which approach works best. Combining our methodology with constant user involvement will make sure you eliminate the worst assumption in IT: we know how the employees do their job and what they need … the peril of experience! Do we always eliminate assumptions? Let me make it a little more complicated: Again… imagine: you’ve been going to the same supermarket for the last 10 years, it’s pretty safe to assume that the cereal is still in the same aisle, even on the same shelf as yesterday. If you would stop assuming where the cereal is … this means you would lose a huge amount of time, browsing through the whole store. Not just once, but over and over again. The same goes for our job. If we would do our job without relying on our experience, we would not be able to make estimations about budget and time. Every estimation is based upon assumptions. The more experienced you are, the more accurate these assumptions will become. But do they lead to good and reliable estimations? Not necessarily… Back to my driving metaphor … We take the same road to work every day. Based upon experience I can estimate it will take me 30 minutes to drive to work. But what if they’ve announced traffic jams on the radio and I haven’t heard the announcement… my estimation will not have been correct. At ACA Group, we use a set of key practices while estimating. First of all, it is a team sport. We never make estimations on our own, and although estimating is serious business, we do it while playing a game: Planning poker. Let me enlighten you; planning poker is based upon the principle that we are better at estimating in group. So we read the story (chunk of functionality) out loud, everybody takes a card (which represent an indication of complexity) and puts them face down on the table. When everybody has chosen a card, they are all flipped at once. If there are different number shown, a discussion starts on the why and how. Assumptions, that form the basis for one’s estimate surface and are discussed and validated. Another estimation round follows, and the process continues till consensus is reached. The end result; a better estimate and a thorough understanding of the assumptions surrounding the estimate. These explicit assumptions are there to be validated by our stakeholders; a great first tool to validate our understanding of the scope.So do we always eliminate assumptions? Well, that would be almost impossible, but making assumptions explicit eliminates a lot of waste. Want to know more about this Agile Estimation? Check out this book by Mike Cohn . Hey! This is a contradiction… So what about these assumptions? Should we try to avoid them? Or should we rely on them? If you assume you know everything … you will never again experience astonishment. As Aristotle already said : “It was their wonder, astonishment, that first led men to philosophize”. Well, a process that validates the assumptions made through well conducted experiments and rapid feedback has proven to yield great results. So in essence, managing your assumptions well, will produce wonderful things. Be aware though that the Curse of Knowledge is lurking around the corner waiting for an unguarded moment to take over. Interested in joining our team? Interested in meeting one of our team members? Interested in joining our team? We are always looking for new motivated professionals to join the ACA team! {% module_block module "widget_3ad3ade5-e860-4db4-8d00-d7df4f7343a4" %}{% module_attribute "buttons" is_json="true" %}{% raw %}[{"appearance":{"link_color":"light","primary_color":"primary","secondary_color":"primary","tertiary_color":"light","tertiary_icon_accent_color":"dark","tertiary_text_color":"dark","variant":"primary"},"content":{"arrow":"right","icon":{"alt":null,"height":null,"loading":"disabled","size_type":null,"src":"","width":null},"tertiary_icon":{"alt":null,"height":null,"loading":"disabled","size_type":null,"src":"","width":null},"text":"View career opportunities"},"target":{"link":{"no_follow":false,"open_in_new_tab":false,"rel":"","sponsored":false,"url":{"content_id":229022099665,"href":"https://25145356.hs-sites-eu1.com/en/jobs","href_with_scheme":null,"type":"CONTENT"},"user_generated_content":false}},"type":"normal"}]{% endraw %}{% end_module_attribute %}{% module_attribute "child_css" is_json="true" %}{% raw %}{}{% endraw %}{% end_module_attribute %}{% module_attribute "css" is_json="true" %}{% raw %}{}{% endraw %}{% end_module_attribute %}{% module_attribute "definition_id" is_json="true" %}{% raw %}null{% endraw %}{% end_module_attribute %}{% module_attribute "field_types" is_json="true" %}{% raw %}{"buttons":"group","styles":"group"}{% endraw %}{% end_module_attribute %}{% module_attribute "isJsModule" is_json="true" %}{% raw %}true{% endraw %}{% end_module_attribute %}{% module_attribute "label" is_json="true" %}{% raw %}null{% endraw %}{% end_module_attribute %}{% module_attribute "module_id" is_json="true" %}{% raw %}201493994716{% endraw %}{% end_module_attribute %}{% module_attribute "path" is_json="true" %}{% raw %}"@projects/aca-group-project/aca-group-app/components/modules/ButtonGroup"{% endraw %}{% end_module_attribute %}{% module_attribute "schema_version" is_json="true" %}{% raw %}2{% endraw %}{% end_module_attribute %}{% module_attribute "smart_objects" is_json="true" %}{% raw %}null{% endraw %}{% end_module_attribute %}{% module_attribute "smart_type" is_json="true" %}{% raw %}"NOT_SMART"{% endraw %}{% end_module_attribute %}{% module_attribute "tag" is_json="true" %}{% raw %}"module"{% endraw %}{% end_module_attribute %}{% module_attribute "type" is_json="true" %}{% raw %}"module"{% endraw %}{% end_module_attribute %}{% module_attribute "wrap_field_tag" is_json="true" %}{% raw %}"div"{% endraw %}{% end_module_attribute %}{% end_module_block %}
Read more

ACA does a lot of projects. In the last quarter of 2017, we did a rather small project for a customer in the financial industry. The deadline for the project was at the end of November and our customer was getting anxious near the end of September. We were confident we could pull off the job on time though and decided to try out an experiment. We got the team together in one room and started mob programming . Mob what? We had read an article that explains the concept of mob programming. In short, mob programming means that the entire team sits together in one room and works on one user story at a time. One person is the ‘driver’ and does the coding for a set amount of time. When that time has passed, the keyboard switches to another team member. We tried the experiment with the following set-up: Our team was relatively small and only had 4 team members. Since the project we were working on was relatively small, we could only assing 4 people. The user stories handled were only a part of the project. Because this was en experiment, we did not want the project - as small as it was - to be mobbed completely. Hence, we chose one specific epic and implemented those user stories in the mob. We did not work on the same computer. We each had a separate laptop and checked in our code to a central versioning system instead of switching the keyboard. This wasn't really a choice we made, just something that happened. We switched every 20 minutes. The article we referred to talks about 12, but we thought that would be too short and decided to go with 20 minutes instead. Ready, set, go! We spent more than a week inside a meeting room where we could, in turn, connect our laptops to one big screen. The first day of the experiment, we designed. We stood at the whiteboard for hours deciding on the architecture of the component we were going to build. On the same day, our mob started implementing the first story. We really took off! We flew through the user story, calling out to our customer proxy when some requirements were not clear. Near the end of the day, we were exhausted. Our experiment had only just started and it was already so intense. The next days, we continued implementing the user stories. In less than a week, we had working software that we could show to our customer. While it wasn’t perfect yet and didn’t cover all requirements, our software was able to conduct a full, happy path flow after merely 3 days. Two days later, we implemented enhancements and exception cases discussed through other user stories. Only one week had passed since our customer started getting anxious and we had implemented so much we could show him already. Finishing touches Near the end of the project, we only needed to take care of some technicalities. One of those was making our newly-built software environment agnostic. If we would have finished this user story with pair programming, one pair would know all the technical details of the software. With mob programming, we did not need to showcase it to the rest of the team. The team already knew. Because we switched laptops instead of keyboards, everyone had done the setup on their own machine. Everyone knew the commands and the configuration. It was knowledge sharing at its best! Other technicalities included configuring our software correctly. This proved to be a boring task for most of the navigators. At this point, we decided the mob experiment had gone far enough. We felt that we were not supposed to do tasks like these with 4 people at the same time. At least, that’s our opinion. Right before the mob disbanded, we planned an evaluation meeting. We were excited and wanted to do this again, maybe even at a bigger scale. Our experience with mob programming The outcome of our experiment was very positive. We experienced knowledge sharing at different levels. Everyone involved knew the complete functionality of the application and we all knew the details of the implementation. We were able to quickly integrate a new team member when necessary, while still working at a steady velocity. We already mentioned that we were very excited before, during and after the experiment. This had a positive impact on our team spirit. We were all more engaged to fulfill the project. The downside was that we experienced mob programming as more exhausting. We felt worn out after a day of being together, albeit in a good way! Next steps Other colleagues noticed us in our meeting room programming on one big screen. Conversations about the experiment started. Our excitement was contagious: people were immediately interested. We started talking about doing more experiments. Maybe we could do mob programming in different teams on different projects. And so it begins… Have you ever tried mob programming? Or are you eager to try? Let’s exchange tips or tricks! We’ll be happy to hear from you!
Read more

OutSystems: a catalyst for business innovation In today's fast-paced business landscape, organisations must embrace innovative solutions to stay ahead. There are a lot of strategic technological trends that address crucial business priorities such as digital immunity, composability, AI, platform engineering, Low-Code , and sustainability. OutSystems , the leading Low-Code development platform , has become a game-changer in supporting organisations to implement these trends efficiently and sustainably. OutSystems enhances cyber security As organisations increasingly rely on digital systems, cyber threats pose a significant risk. Additionally, digital engagement with customers, employees, and partners, plays a vital role in a company's well-being. The immunity and resilience of an organisation is now as strong and stable as its core digital systems. Any unavailability can result in a poor user experience, revenue loss, safety issues, and more. OutSystems provides a robust and secure platform that helps build digital immune systems , safeguarding against evolving cybersecurity challenges. With advanced threat detection, continuous monitoring, secure coding practices , and AI code-scanning, OutSystems ensures applications are resilient and protected. Furthermore, the platform covers most of the security aspects for project teams, enabling them to focus on delivering high value to end customers while best practices are recommended by the platform through code analysis using built-in patterns. OutSystems simplifies cloud-native infrastructure management Cloud-native architecture has emerged as a vital component for modern application development. The OutSystems Developer Cloud Platform enables teams to easily create and deploy cloud-native applications, leveraging the scalability and flexibility of cloud infrastructure through Kubernetes . It allows companies to: Optimise resource utilisation Auto-scale application runtimes Reduce operational costs Adopt sustainable practices (serverless computing, auto-scaling, …) All this without the need for prior infrastructure investment nor the deep technical knowledge required to operate it and the typical burdens associated. OutSystems: gateway to AI and automation AI and hyper-automation have become essential business tools for assisting in content creation, virtual assistants, faster coding, document analysis, and more. OutSystems empowers professional developers to be more productive by infusing AI throughout the application lifecycle. Developers benefit from AI-assisted development, natural language queries, and even Generative AI. Once ready with your development, transporting an app to the test or production environment only takes a few clicks. The platform highly automates the process and even performs all the necessary validations and dependency checks to ensure unbreakable deployments. OutSystems seamlessly integrates with AI capabilities from major cloud providers like Amazon, Azure (OpenAI), and Google, allowing project teams to leverage generative AI, machine learning, natural language processing , and computer vision . By making cutting-edge technologies more accessible, OutSystems accelerates digital transformation and creates sustainable competitive advantages. OutSystems enables composable architecture for agility Composable architecture and business apps, characterised by modular components, enable rapid adaptation to changing business needs. OutSystems embraces this trend by providing a cloud-native Low-Code platform using and supporting this type of architecture. It enables teams to easily build composable technical and business components. With the visual modelling approach of Low-Code, a vast library of customizable pre-built components and a micro-service-based application delivery model, OutSystems promotes high reusability and flexibility. This composable approach empowers organisations to: Respond rapidly to changing business needs Experiment with new ideas Create sustainable, scalable, and resilient solutions OutSystems enables the creation of business apps that can be easily integrated, replaced, or extended, supporting companies on their journey towards composability and agility. OutSystems facilitates self-service and close collaboration Platform engineering, which emphasises collaboration between development and operations teams, drives efficiency and scalability. OutSystems provides a centralised Low-Code platform embracing this concept at its core by being continuously extended with new features, tools and accelerators. Furthermore the platform facilitates the entire application development lifecycle until operations . Including features like Version control Automated deployment Continuous integration and delivery (CI/CD) Logging Monitoring Empowering organisations to adopt agile DevOps practices. With OutSystems, cross-functional teams can collaborate seamlessly, enabling faster time-to-market and improved software quality. By supporting platform engineering principles, OutSystems helps organisations achieve sustainable software delivery and operational excellence. OutSystems drives sustainability in IT OutSystems leads the way in driving sustainability in IT through its green IT Low-Code application development platform and strategic initiatives. By enabling energy-efficient development, streamlining application lifecycle management, leveraging a cloud-native infrastructure , and promoting reusability , OutSystems sets an example for the industry. Organisations can develop paperless processes, automate tasks, modernise legacy systems, and simplify IT landscapes using OutSystems 3 to 4 times faster, reducing overall costs and ecological footprint. By embracing OutSystems, companies can align their IT operations with a greener future, contribute to sustainability, and build a more resilient planet. Wrapping it up In the era of digital transformation and sustainability, OutSystems is a powerful ally for organisations, delivering essential business innovations, such as … High-performance Low-Code development Cloud-native architecture AI and automation Robust security measures Collaborative DevOps practices Take the OutSystems journey to align with IT trends, deliver exceptional results, and contribute to a sustainable and resilient future. Eager to start with OutSystems? Let us help
Read moreWant to dive deeper into this topic?
Get in touch with our experts today. They are happy to help!

Want to dive deeper into this topic?
Get in touch with our experts today. They are happy to help!

Want to dive deeper into this topic?
Get in touch with our experts today. They are happy to help!

Want to dive deeper into this topic?
Get in touch with our experts today. They are happy to help!


